Instances
Instances
If your question is not addressed below, contact us through our feedback form and we will get back to you shortly.
- What is an IDrive® Compute instance?
- How do I create a virtual instance with IDrive® Compute?
- What does the available capacity of a region denote?
- How does a Dedicated CPU Instance differ from a Shared CPU Instance?
- What does the following status for a region mean?
- Can I preview the specifications of an instance before creation?
- IPv6 is not configured for my instance. How do I set it?
- How do I edit the DNS Pointer Record (PTR) for an instance?
- How do I determine the best location to host an Instance?
- Can I backup an instance created with my IDrive® Compute account?
- How do I enable/schedule backup of an instance?
- How do I disable a scheduled backup?
- Is it possible to restore an instance from backup?
- Can I change the existing billing plan for an instance?
- Where can I view my instances?
- What actions can I perform on my instances?
- How do I manage the instances in my account from the web console?
- How do I enable event-based alerts for my instances?
- How do I set up event-based notifications for my instances?
- How do I disable event-based alerts for my instances?
- How do I upload a custom image?
- How do I create an instance using a custom image?
- Can I migrate my instance from one region to another?
- Can I clone an instance?
- How do I resize an instance?
- How will I be charged if I resize my instance?
- How do I rescue and unrescue an instance?
- How do I mount the rescued instance disk on the rescuing OS?
- I am not able to login with the root password after rescuing my instance. Why?
- How do I rebuild an instance?
- How do I copy a snapshot/backup/ custom image to a specific region?
- How do I provide user data to an instance?
- What is a virtual console and how can it be used?
- Can I assign a private IP for my instances?
- How do I configure a private IPv4 network for openSUSE instances?
- How do I add an SSH Key to my IDrive® Compute account?
- How do I generate a new SSH Key?
- How do I view the details of an SSH Key?
- How do I delete an SSH Key?
- What is an IDrive® Compute snapshot?
- How do I create a snapshot of an instance?
- How do I create an instance using a snapshot?
- What is a firewall?
- How do I create a new firewall in my IDrive® Compute account?
- What types of firewall rules can I configure in my account?
- How do I attach a firewall to an instance?
- Can I edit the rules configured for a firewall?
- How do I delete a firewall rule?
- How do I edit a firewall name?
- What sources can I add in my firewall rule?
- Why are the outgoing TCP ports blocked? Is it possible to unblock the ports?
- How do I delete a firewall from my account?
- What is a default firewall and why is it created?
Backup
Instance Management
SSH Key
Snapshot
Firewall
What is an IDrive® Compute instance?
Instances are virtual machines (VMs) hosted on hardware resources that are managed by IDrive® Compute. You can create and customize multiple instances configured with an OS of your choice in a few clicks.
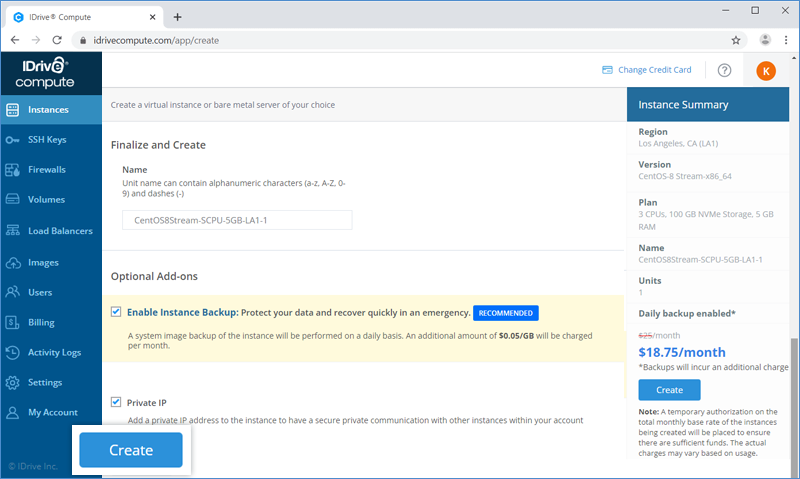
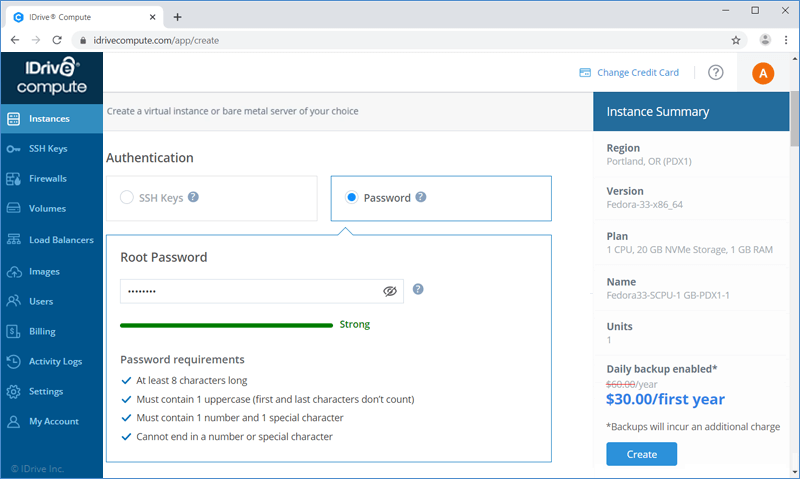
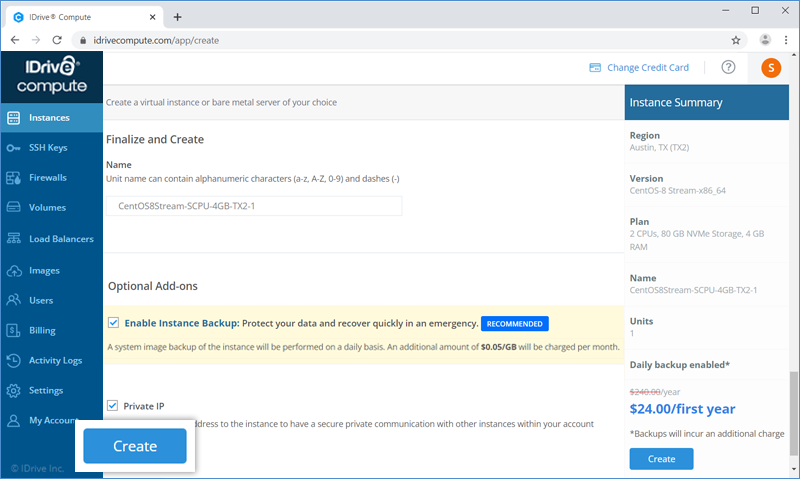
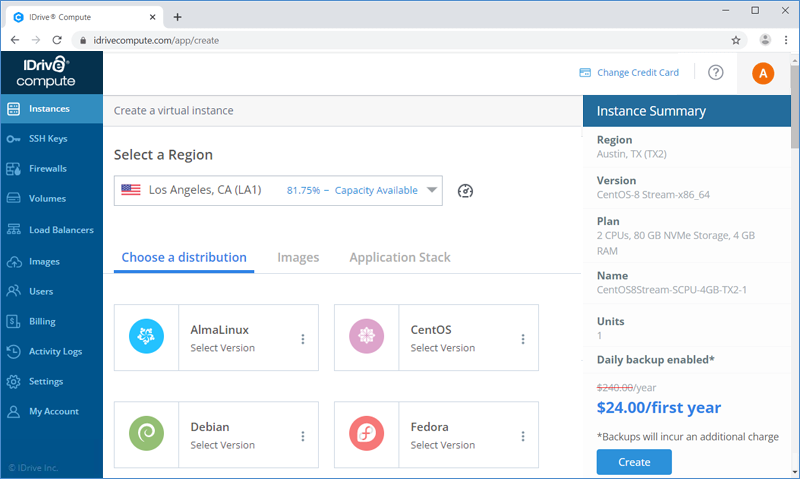
How do I create a virtual instance with IDrive® Compute?
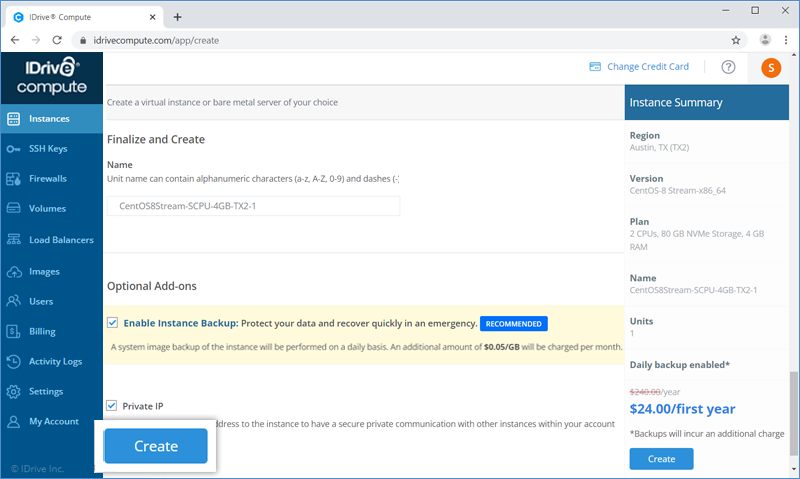
To create a new instance,
- Sign in to your IDrive® Compute account.
- Click Create Instance > Virtual Server on the web console.
- Select a Region from the drop-down list. The available capacity for each region is displayed to help you determine the most suitable location for the instance.
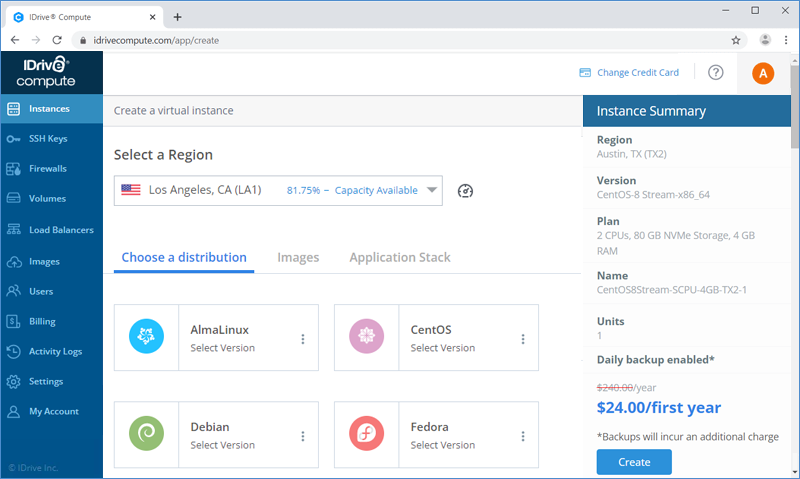
- Choose a standard distribution, or select a custom image or application stack image which you want to use for creating an instance.
- Choose a plan. You can select shared or dedicated CPU and choose yearly or monthly billing.
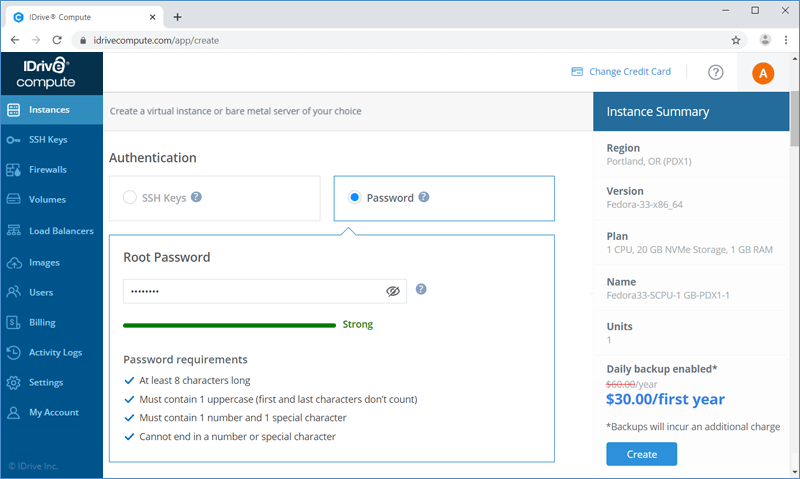
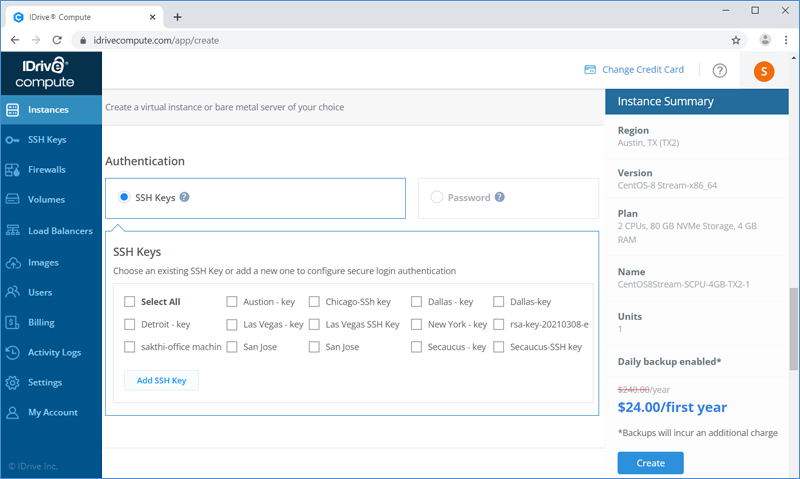
- Select an authentication method for the instance. You can either set an SSH key or a root password for authentication.
- SSH-Keys - Select SSH Keys from the list of pre-added keys. To add a new key, click Add an SSH Key. Enter the key name and your existing SSH Public Key details, click Add Key.
- Password - A root password will be suggested by default. You may use the same password or create a new password.
- Enter User Data in cloud-config format. This is optional.
- Add the required number of instances and instance names under Finalize and Create.
- Activate the following add-ons as required by clicking the corresponding checkbox:
- Enable Backup - By default, the option to enable daily cloud-based image backup for the instance is selected. Deselect the option if you do not want to enable backup.
- Private IP - Select this option to get a private IP address for your instance.
- Click Create.
On successful creation of a new instance, a message will be displayed and the new instance will be listed in the Instances page. You can now access, use, and manage it.
Note:
- A temporary authorization on the total monthly base rate of the instances being created will be placed to ensure there are sufficient funds. The actual charges may vary based on usage.
- The overall performance of the instances depend on the capacity available at the selected region.
What does the available capacity of a region denote?
The available capacity of a region refers to the availability of the resources in that region at a specific point of time. An instance will perform faster if the available capacity of the selected region is higher. You can use the displayed percentage capacity for a region to determine the best deployment location for an instance as per your requirements.
A region with a high ‘Available Capacity' percentage denotes higher availability of resources for faster performance of your instance. A region with ‘Limited Capacity’ percentage implies lower availability of resources for the instance at the time of creation. An ‘Under Maintenance’ region implies that the resources are under maintenance and not available at the moment.
How does a Dedicated CPU Instance differ from a Shared CPU Instance?
In a Dedicated CPU Instance the allotted physical CPU cores are exclusively only for use of that instance unlike a Shared CPU Instance, where you share the virtual CPU cores with other instances.
Other instances cannot schedule processes on the dedicated CPU cores, so there is no waiting time for your instance, making it an ideal choice for CPU-intensive jobs requiring high processing power jobs like:
- Big data analysis
- Machine learning
- Video streaming services
- Gaming servers
- Scientific computing
What does the following status for a region mean?
- Under Maintenance: The region is currently under maintenance and its resources are not available.
- Upcoming: The region is not currently available. It will be provisioned soon.
Can I preview the specifications of an instance before creation?
Yes, you can review your selections and make modifications before creating an instance under the Instance Summary section. This section displays all the configurations selected by you for the instance.
IPv6 is not configured for my instance. How do I set it?
By default all compute instances will have IPv6 enabled. However, in some of the cases for instances running on Fedora 31, Fedora 32, and Debian 9 distributions, it may not get enabled automatically during their creation.
For such an instance you will have to configure IPv6 manually.
To configure IPv6 manually,
- Login to the instance.
- Copy the IPv6 address from the console.
- Copy the default gateway address from the console.
- Execute the following commands depending on the Linux distribution the instance is running on:
$ sudo  sh -c 'cat << EOF >> /etc/sysconfig/network-scripts/ifcfg-eth0

							IPV6ADDR = IP_ADDRESS_FROM_THE_CONSOLE

							IPV6INIT = yes

							IPV6_DEFAULTGW = GATEWAY_ADDRESS_FROM_THE_CONSOLE

							EOF

							'
E.g. If we assume that the IP address for your instance as per the selected region is 2600:3004:1200:1100::a1/64 and the default gateway address is 2600:3004:1200:1100::1, the file will look like this:
$ sudo  sh -c 'cat << EOF >> /etc/sysconfig/network-scripts/ifcfg-eth0

							IPV6ADDR = 2600:3004:1200:1100::a1/64

							IPV6INIT = yes

							IPV6_DEFAULTGW = 2600:3004:1200:1100::1

							EOF

							'
After adding the above-mentioned information to the network configuration file of the instance, run 'ifup eth0'. This will assign an IPv6 address to the instance.
Check 'ip address' to confirm if IPv6 has been assigned to eth0. If it has not been assigned, reboot the instance to apply the changes.
For Debian 9
$ sudo  sh -c 'cat << EOF >>  /etc/network/interfaces.d/50-cloud-init.cfg

							iface eth0 inet6 static

								address IP_ADDRESS_FROM_THE_CONSOLE

								post-up route add -A inet6 default gw GATEWAY_ADDRESS_FROM_THE_CONSOLE || true

								pre-down route del -A inet6 default gw GATEWAY_ADDRESS_FROM_THE_CONSOLE || true

							EOF

							'
E.g. If we assume that the IP address for your instance as per the selected region is 2600:3004:1200:1100::a1/64 and the default gateway address is 2600:3004:1200:1100::1, the file will look like this:
							$ sudo  sh -c 'cat << EOF >> /etc/network/interfaces.d/50-cloud-init.cfg

							iface eth0 inet6 static

								address 2600:3004:1200:1100::1e4/64

								post-up route add -A inet6 default gw 2600:3004:1200:1100::1 || true

								pre-down route del -A inet6 default gw 2600:3004:1200:1100::1 || true

							EOF

							'
After adding the above-mentioned information to the network configuration file of the instance, run sudo systemctl restart networking'. This will assign an IPv6 address to the instance.
Check the 'ip address' to confirm if IPv6 has been assigned to ens3. If it has not been assigned, reboot the instance to apply the changes.
To test the IPv6 configuration, try pinging ping6 google.com from the instance.
If IPv6 is properly configured, you will receive an output similar to this:
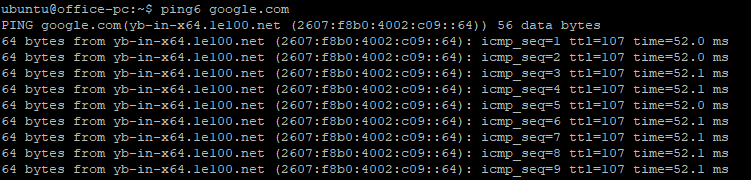
This means the instance can now communicate with other sites and servers that have IPv6 enabled.
If you still cannot connect to the instance, check the changes made to the configuration file for errors, then reboot and test again. Raise a support ticket in case of any further issue.
How do I edit the DNS Pointer Record (PTR) for an instance?
To edit a DNS Pointer Record (PTR) for IPv4 address,
- Sign in to your IDrive® Compute account.
- Click the instance for which you want to edit the DNS Pointer Record (PTR).
- Select Networking from the LHS menu.
- Click
 next to the IPv4 address whose PTR you want to edit.
The Edit Reverse DNS screen will appear.
- Enter the DNS pointer record (PTR).
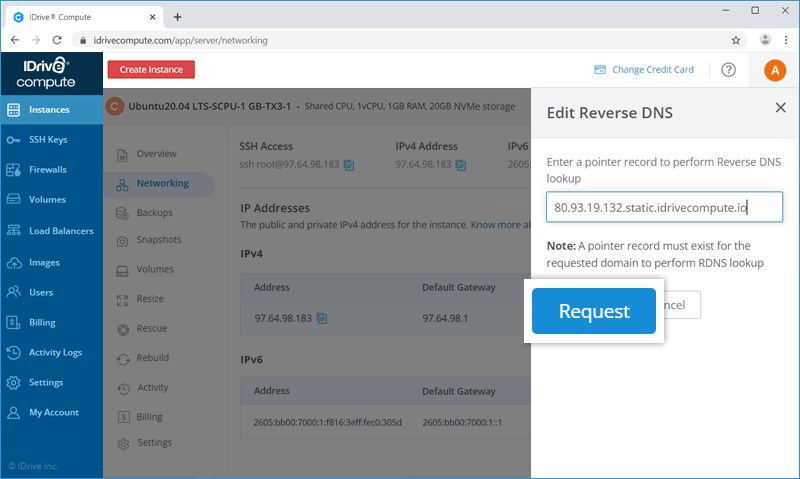
- Click Request.
Once you enter the PTR, it will be stored under the IP address for Reverse DNS lookups. You can view the Reverse DNS PTR records for the required IP addresses in the IP Addresses section on the web console.
To edit a DNS Pointer Record for IPv6 address, you can contact support to submit a request.
How do I determine the best location to host an Instance?
A region that is closest to you and the end users ensures rapid connectivity and low latency for your instance. You can perform a speed test for the various regions and determine the best location to host an instance.
Can I backup an instance created with my IDrive® Compute account?
Yes, you can enable backup for your compute instances to maintain an offsite repository and for new instance creation. Enabling backup will schedule an automatic rotation as per the selected option.
By default, the option to enable backup will be selected at the time of instance creation. It is strongly recommended that you enable backup for your compute instances to recover from any failure.
Note:
- The compute instance may go into a paused state for a short period of time during the backup operation and will resume automatically. This is to ensure the data integrity of the instance.
- Backup cannot be created for bare-metal instances.
How do I enable/schedule backup of an instance?
The Enable Backup option under Optional Add-ons remains selected by default while creating a new instance. If you choose to deselect it during instance creation, you can enable it anytime later.
To enable backup for an instance later,
- Sign in to your IDrive® Compute account.
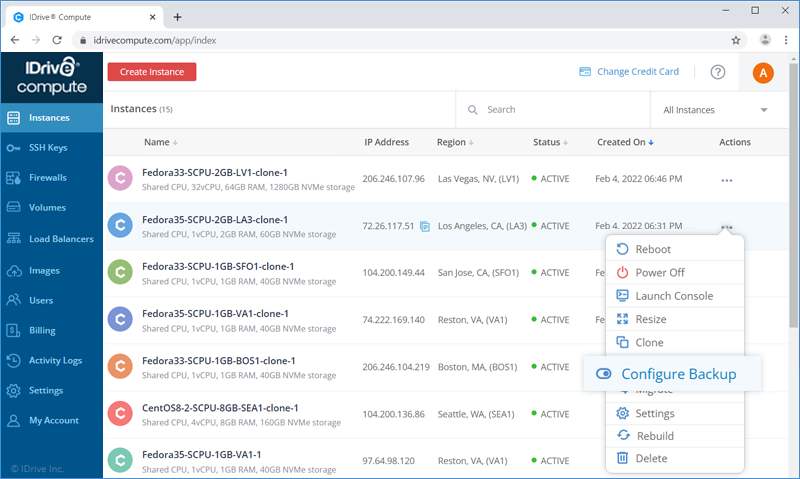
- Click Actions against the instance which you want to backup, select Configure Backup.
- Click Enable Daily Backup in the Backups tab to backup the instance on a daily basis. To perform automated backup on a weekly basis, click Enable Weekly Backup.

Note: Backups will be charged additionally at $0.05/GB/month.
How do I disable a scheduled backup?
To disable a scheduled backup,
- Sign in to your IDrive® Compute account.
- Click Actions against the instance for which you want to disable the schedule, select Configure Backup.
- Click Disable Daily Backup if you have a daily backup schedule enabled. To disable a weekly backup schedule, click Disable Weekly Backup.
Alternatively, you can click the instance, go to the Backups tab, and disable the backup schedule.
Note: Disabling backup will not delete backups that have already been taken and you can access them from the Backups tab.
Is it possible to restore an instance from backup?
Yes, you can recover an instance from a backup. To restore an instance from a backup you simply need to select the backup and create an instance.
- Sign in to your IDrive® Compute account.
- Go to the Images tab and click Backups.
- Click Actions against the backup which you want to use for creating an instance.
- Select Create an instance.
- Select a Region from the drop-down list.
- The backup that you are using to create the instance will be selected by default.
- Choose a plan. You can select shared or dedicated CPU and choose yearly or monthly billing.
- Select an authentication method for the instance. You can either set an SSH key or a root password for authentication.
- SSH-Keys - Select SSH Keys from the list of pre-added keys. To add a new key, click Add an SSH Key. Enter the key name and your existing SSH Public Key details, click Add Key.
- Password - A root password will be suggested by default. You may use the same password or create a new password.
- Enter User Data in cloud-config format.
- Add the required number of servers and server name under Finalize and Create.
- Activate the following add-ons as required by clicking the corresponding checkbox:
- Enable Backup - By default, the option to enable daily cloud-based image backup for the instance is selected. Deselect the option if you do not want to enable backup.
- Private IP - Select this option to get a private IP address for your instance.
- Click Create.
On successful creation of a new instance, a message will be displayed and the instance will be listed in the Instances page.
You can also download a backup of your instance to your computer and create an instance from it right away or use it later.
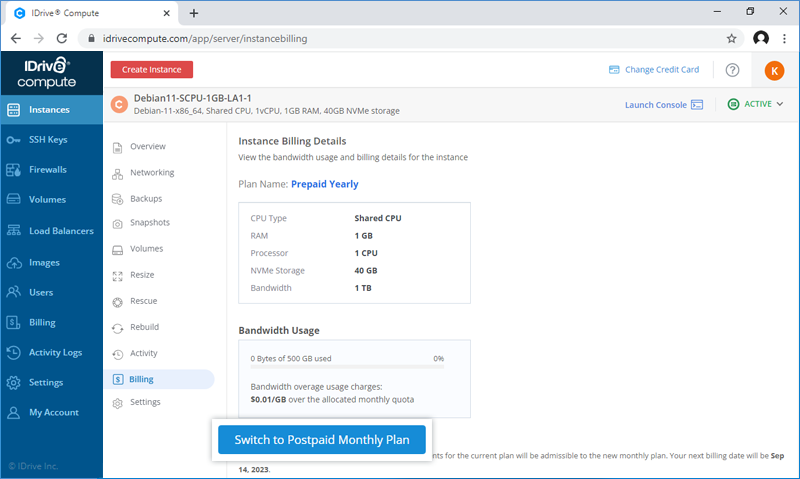
Can I change the existing billing plan for an instance?
Yes, you can change your current subscription from Prepaid Yearly subscription to Postpaid Monthly.
To change your subscription,
- Sign in to your IDrive® Compute account.
- Click the instance for which you want to switch the plan.
- Go to Billing and click Switch to Postpaid Monthly Plan.
- Click Yes in the confirmation popup.
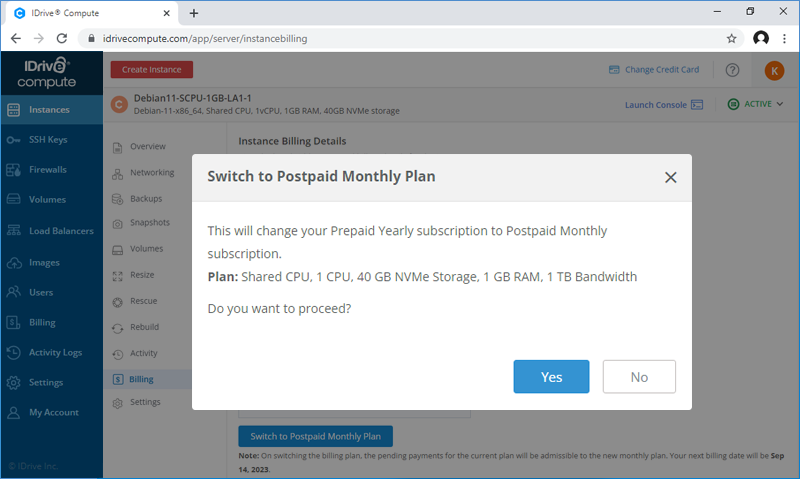
Once the plan is switched, the current yearly plan will not be renewed at the end of term and the postpaid monthly plan will be applicable from the next renewal date.
Note: On switching the billing plan, the pending payments for the current yearly plan will be admissible to the new monthly plan.
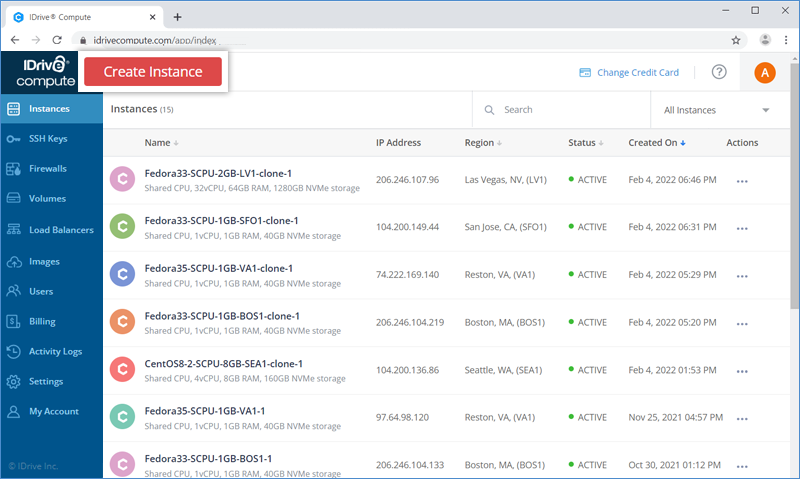
Where can I view my instances?
IDrive® Compute offers an easy-to-use centralized web console from where you can view, access, and manage all compute instances.
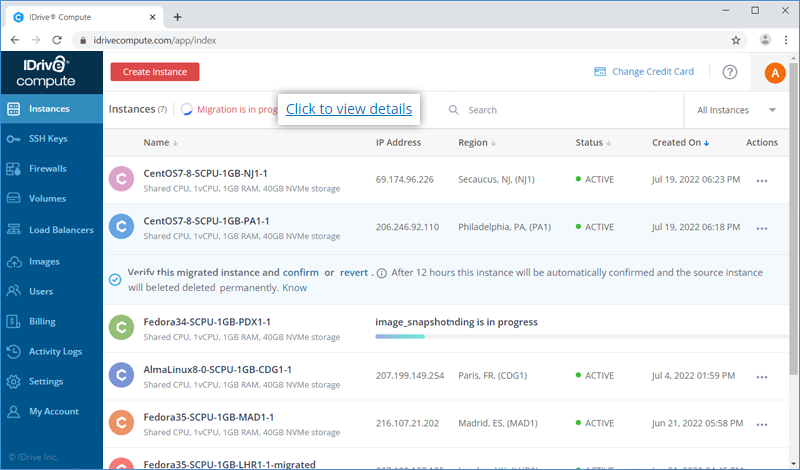
All the instances created with your account can be viewed from the Instances tab. Here you can see the list of all instances, along with their IP address, region, current status, and date of creation.
You can also search for a particular instance and filter the list based on the status type.
What actions can I perform on my instances?
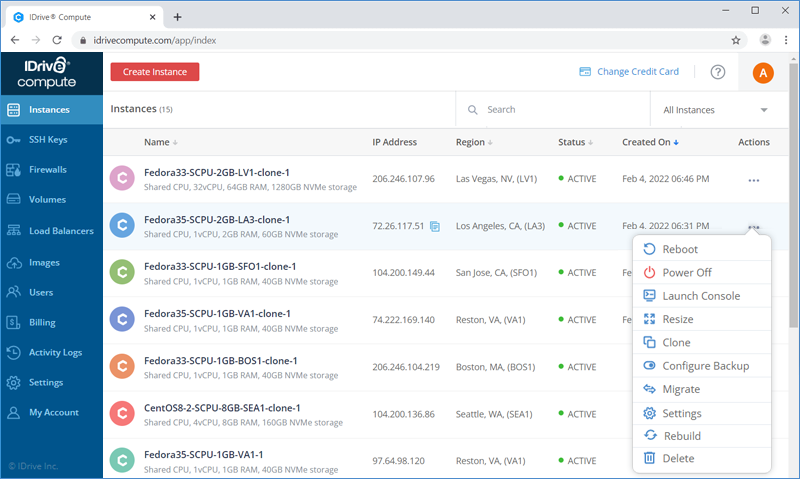
You can perform reboot/restart or turn off the instances, configure backup, configure settings, launch console, resize and delete an instance.
Click Actions and perform the following operations for an instance:
- Reboot - Reboot/restart the instance to up its performance and keep it running.
- Power Off - Shutdown the instance forcefully. This operation is similar to powering off a physical machine.
- Launch Console - Open a virtual console right from your dashboard to access and manage the instance.
- Resize - Customize the memory, CPU sharing mode (shared CPU/dedicated CPU), and storage configurations of the instance.
- Clone - Create an exact copy of an existing instance with its entire pre-configured environment and data.
- Configure Backup - Activate a weekly and daily backup schedule for the instance. Backups cannot be configured for bare-metal instances.
- Migrate - Migrate a compute instance created in a particular region to a different region, with its entire pre-configured environment.
- Settings - Update the default settings for the instance. From here you can set a new label, create a new root password, or delete the instance.
- Rebuild - Recreate the instance with the same or a new image without changing the existing IP address.
- Delete - Permanently delete the instance from your account with all its data.
How do I manage the instances in my account from the web console?
To view the details of a particular instance and perform various operations related to it click the instance. A menu will appear on the screen from where you can do the following:
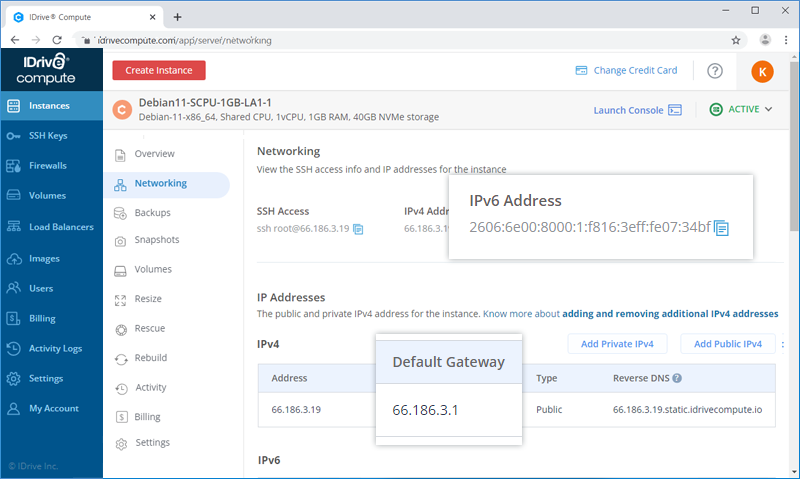
- Overview - View bandwidth usage, CPU usage, disk input/output operations, and IP addresses for the instance.
- Networking - View the SSH access info, IP addresses, and firewall rules for the instance.
- Backups - Schedule an automated daily or weekly disk image backup for the instance. Backups cannot be configured for bare-metal instances.
- Snapshots - Capture a real-time image of the instance with all its contents and save it as a snapshot to restore the instance to a specific point in time or create a new instance in future. This section also displays all the snapshots created for the instance. Snapshots cannot be captured for bare-metal instances.
- Volumes - Create and attach block storage volumes to the instance to expand its storage capacity.
- Resize - Customize the memory, CPU sharing mode (shared CPU/dedicated CPU), and storage configurations of the instance.
- Clone - Create an exact copy of an existing instance with its entire pre-configured environment and data.
- Rescue - Boot the instance in rescue mode when it is unable to boot in the normal mode because of some technical issue.
- Rebuild - Recreate the instance with the same or a new image without changing the existing IP address.
- Activity - View a list of all the recent web-based activities performed for the instance.
- Billing - View the bandwidth usage and billing details for the instance.
- Settings - Modify the instance settings. You can rename an instance, reset the root password, or permanently delete the instance from your account.
How do I enable event-based alerts for my instances?
You can configure alert policies to receive event-based notifications for all the instances in your account. Add email addresses to receive notifications or integrate Slack Channels to get notified.
To enable event-based notifications,
- Sign in to your IDrive® Compute account.
- Go to the Settings tab.
- Click Preferences.
- Click Enable alerts.
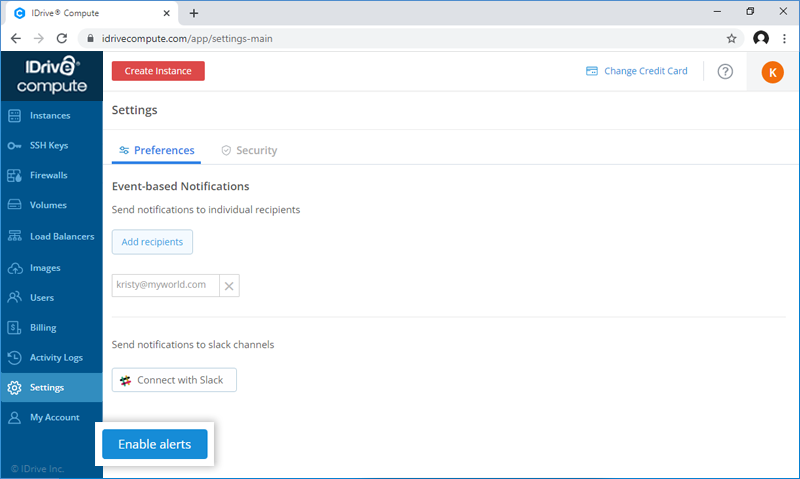
The account administrator and the selected recipients will receive a message once the alert policy is enabled for the instances in your account.
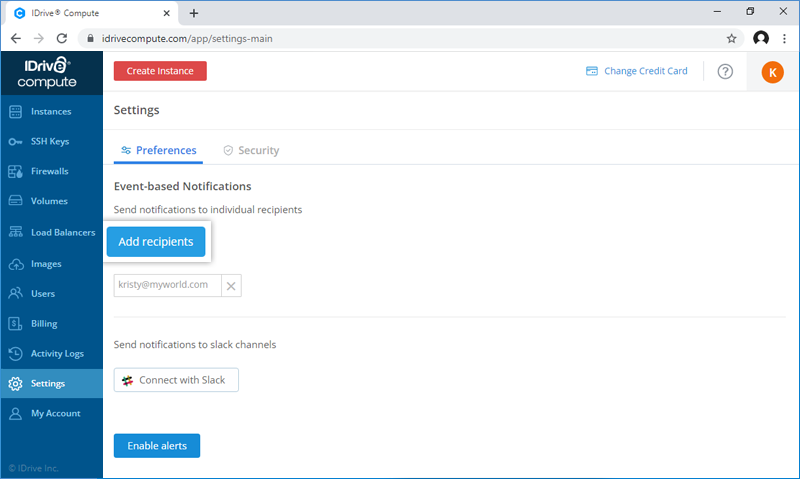
How do I set up event-based notifications for my instances?
IDrive® Compute allows you to set event-based alerts for selected recipients or integrate Slack to get notified.
To send notifications to individual recipients,
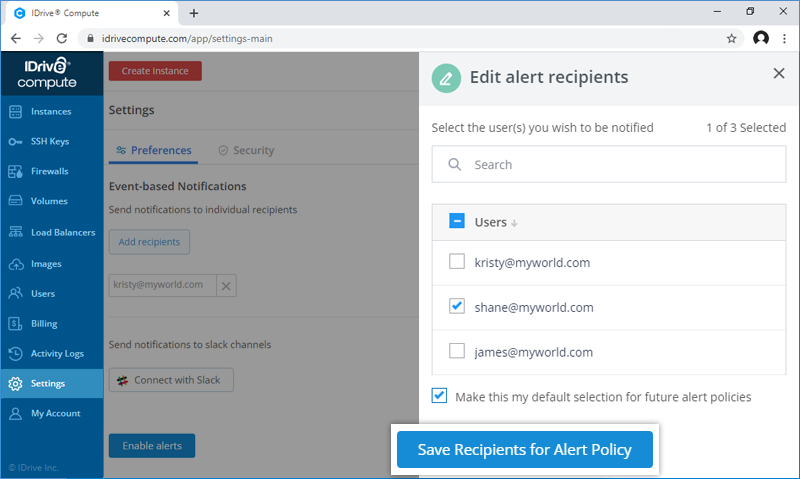
- Click Add recipients in the Event-based Notifications section. A slider window will open.
- Select the email addresses of the recipients who you wish to receive notification.
Note: You can make the current selection as the default selection for future alert policies by clicking the checkbox.
- Click Save Recipients for Alert Policy.
- Click Save changes on the Settings window.

To send notifications to Slack channels,
- Click Connect with Slack. You will be redirected to a new window.
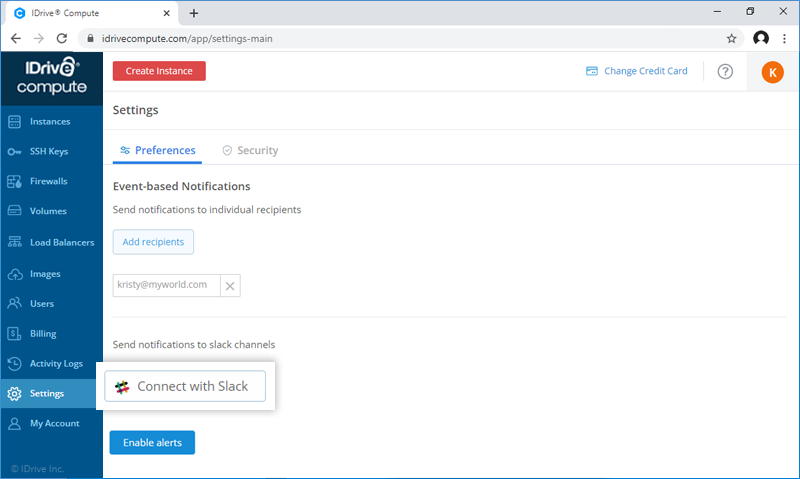
- Enter the Slack URL to which you wish to send the notification. In case you are already logged into one or multiple slack workspace(s), select the workspace from the drop-down menu on the top-right corner.
- Allow IDrive Compute to access your Slack workspace:
- Select what information and content related to you and your Slack workspace(s) IDrive® Compute can view.
- Select a channel where IDrive Compute can post to as an app.
- Click Allow.
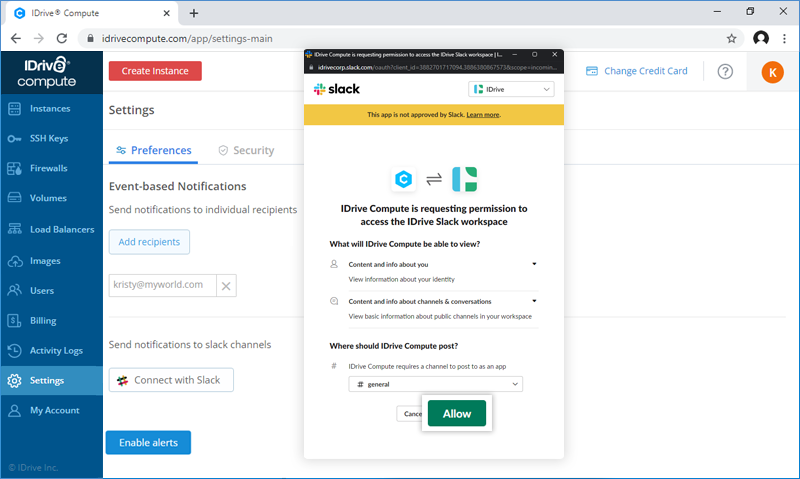
- Click Save changes on the Settings window.
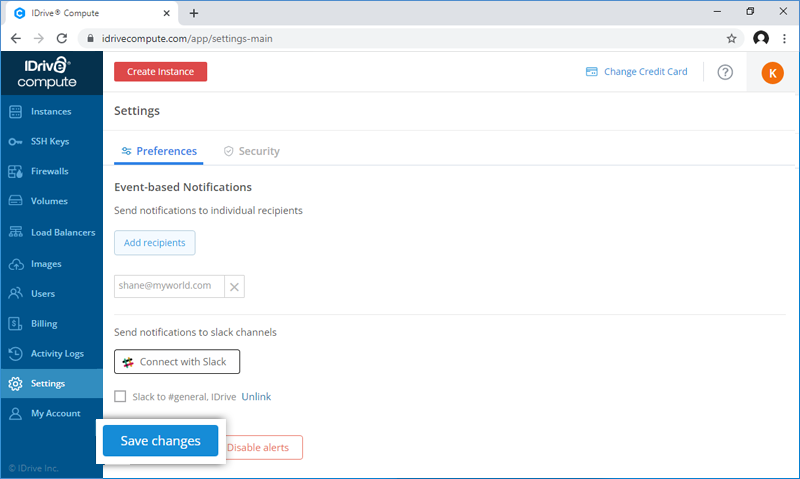
Depending on the alert policy, the recipients will be notified about the actions/events related to the instances in your account.
How do I disable event-based alerts for my instances?
To disable event-based notifications,
- Sign in to your IDrive® Compute account.
- Go to the Settings tab.
- Click Preferences.
- Click Disable alerts.
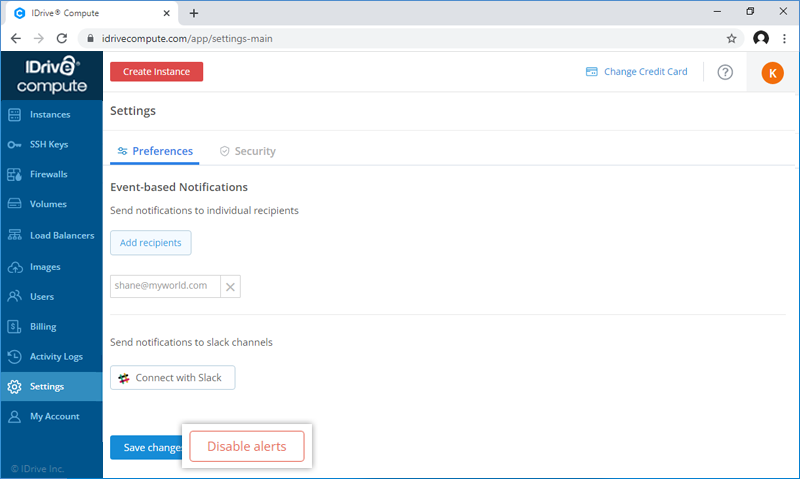
You will receive a message once the alert policy is disabled for the instances in your account.
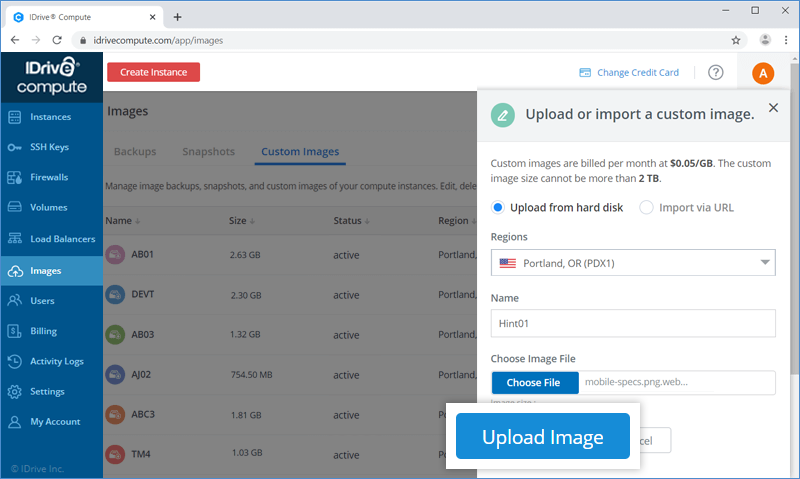
How do I upload a custom image?
You can upload custom images to your account for creating instances.
To upload an image from hard disk,
- Sign in to your IDrive® Compute account.
- Go to the Images tab and click Custom Images.
- Click Upload Image. The option to upload an image from the hard disk is selected by default.
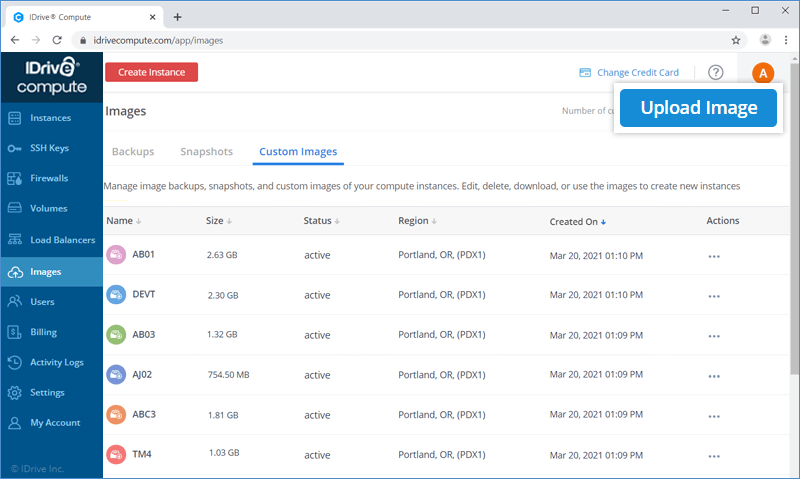
- Enter the image name.
- Click Choose File to browse and select the image.
- Select a Region.
- Click Upload Image.
To import a custom image via URL,
- Sign in to your IDrive® Compute account.
- Go to the Images tab and click Custom Images.
- Click Upload Image.
- Select Import via URL.
- Enter the URL.
- Enter the image name.
- Select a Region.
- Click Upload Image.
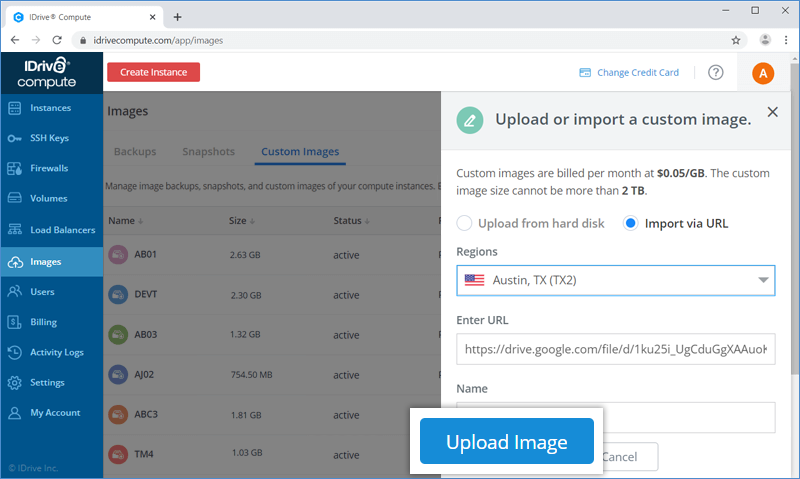
Note:
- Custom images are billed per month at $0.05/GB.
- The custom image size cannot be more than 2 TB.
How do I create an instance using a custom image?
You can create an instance using an active custom image. To upload a custom image see here.
To create an instance,
- Sign in to your IDrive® Compute account.
- Go to the Images tab and click Custom Images.
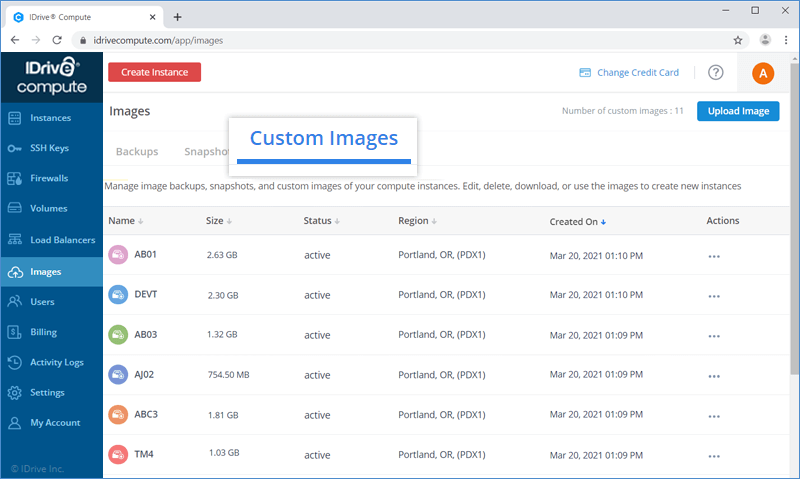
- Click Actions against the image which you want to use for creating an instance.
- Select Create an instance.
- Select a Region from the drop-down list.

- The custom image that you are using to create the instance will be selected by default.
- Choose a plan. You can select shared or dedicated CPU and choose yearly or monthly billing.
- Select an authentication method for the instance. You can either set an SSH key or a root password for authentication.
- SSH-Keys - Select SSH Keys from the list of pre-added keys. To add a new key, click Add an SSH Key. Enter the key name and your existing SSH Public Key details, click Add Key.
- Password - A root password will be suggested by default. You may use the same password or create a new password.
- Enter User Data in cloud-config format.
- Add the required number of instances and instance names under Finalize and Create.
- Activate the following add-ons as required by click the corresponding checkbox:
- Enable Backup - By default, the option to enable daily cloud-based image backup for the instance is selected. Deselect the option if you do not want to enable backup.
- Private IP - Select this option to get a private IP address for your instance.
- Click Create.
Note:
- Custom Image must have sshd installed and configured to run on boot. If sshd is not set up, you will not have SSH access to the instance
- Cloud-init 0.7.7 or higher should be installed and configured properly on the custom image for ssh keys, root password and user-data injection during creation of an instance.
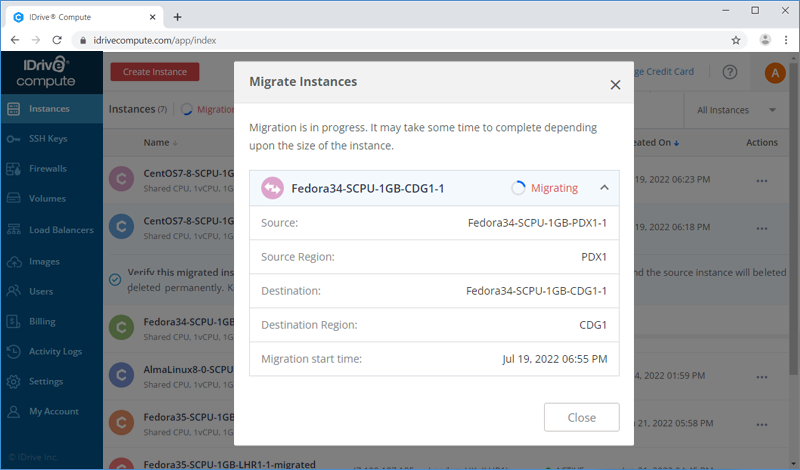
Can I migrate my instance from one region to another?
Yes, you can migrate a compute instance created in a particular region to a different region. Migration will move your existing virtual instance with its entire pre-configured environment and data to the new region.
To migrate an instance,
- Sign in to your IDrive® Compute account.
- Click Actions against the instance which you want to migrate, select Migrate.

- Select the Region where you want to migrate the instance to.

- Modify or use the default name of the instance.
- Read the warning messages and select the checkbox to accept.
- Click Migrate. The progress will be displayed in the Instances tab.
You can view the details of the ongoing instance migration such as the source instance and its region, destination instance and its region, and the migration start time by clicking Click to view details link next to the migration status.
Important Points to Note:
- New IPv4 and IPv6 addresses will be assigned to the migrated instance which can be accessed on successful migration.
- Existing backups of this instance will not be migrated. After successful migration, backups will start as per the schedule in the new region.
- Existing firewalls (including firewall rules) associated with the instance will not be migrated. The default firewall will apply to the migrated instance.
- All DNS records, including Reverse DNS, are required to be updated after the completion of the migration operation.
- The block storage volumes attached to the instance will not be migrated to the new region.
- It may take up to 5 hours for the migration to complete.
- The source instance will be automatically deleted from the original region after 12 hours. This is an irreversible action.
Once the migration is complete, you must verify and confirm the migrated instance or you can choose to revert the migration within 12 hours.
To confirm the migration,
- Click Actions against the instance and select Confirm Migration.
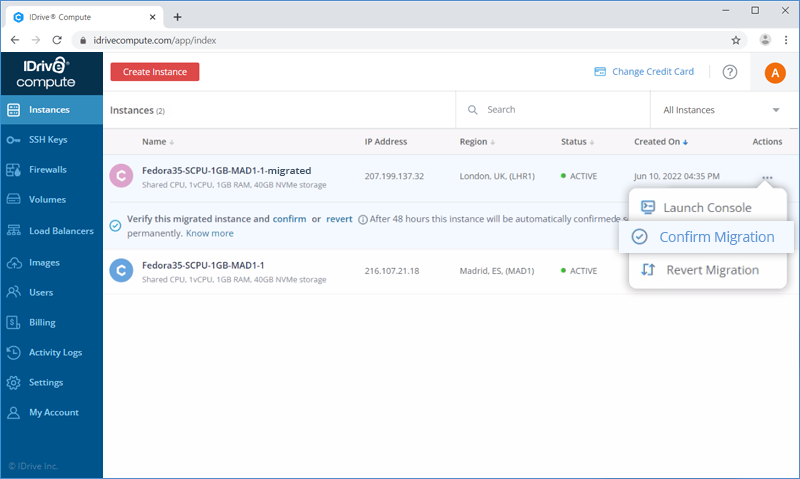
- Click Confirm in the popup.
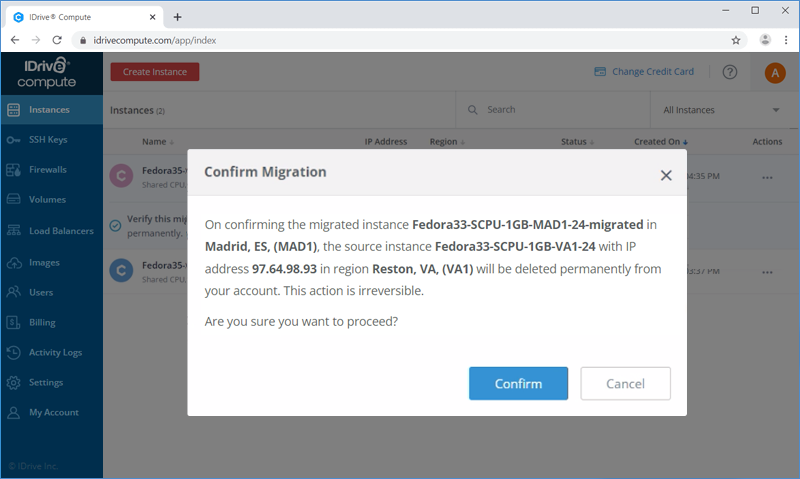
On confirmation, the source instance will be permanently deleted from the original region. This action cannot be reversed.
To revert the migration,
- Click Actions against the instance and select Revert Migration.

- Click Revert in the popup.
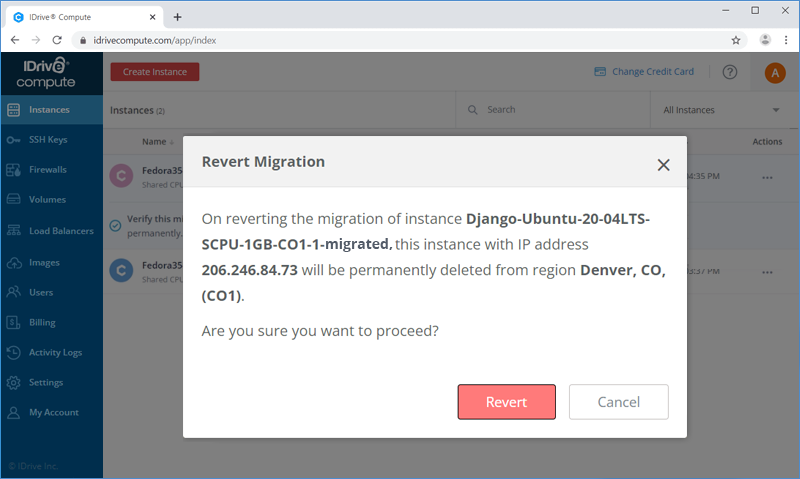
The progress will be displayed in the Instances tab and the migrated instance will be deleted permanently from the destination region.
Yes, you can clone a compute instance created in a particular region to a different region.
Cloning will create an identical replica of your existing virtual instance with its entire pre-configured environment and data.
To clone an instance,
- Sign in to your IDrive® Compute account.
- Click Actions against the instance which you want to clone, select Clone.

- Select a Region from the drop-down list.
- Choose a plan. You can select shared or dedicated CPU and choose yearly or monthly billing.
- Add the required number of instances and instance names under Finalize and Create.
- Click Create. The progress of the cloning operation will be displayed on the screen.
On successful creation of the clone, a message will be displayed and the cloned instance will be listed in the Instances page.
Note: The cloned instance will be created with the same password and SSH Keys (if any) as the original instance.
To resize an instance,
- Sign in to your IDrive® Compute account.
- Click Actions against the instance you want to resize, select Resize.
- Choose a suitable plan.
- Click Resize.
Alternatively, you can click on the instance and select Resize from the LHS menu to perform this operation.
How will I be charged if I resize my instance?
When you initiate a resize operation, you will be charged as per the current plan until the resize happens. Once the resize operation is completed, you will be charged as per the newly subscribed plan.
Yearly Prepaid Plans
For example:
Let's assume you have created an instance at $6/year and after 6 months of usage decided to resize it to a higher plan of $12/year. In that case, the usage charge for the instance will be $3 ($6*6/12) till the 1st of July and for the remaining 6 months of your billing cycle, you will be billed $6 ($12*6/12).
Monthly Postpaid Plans
For example:
Let's assume you have subscribed to a $5/month plan ($0.0074/hour) and used the instance for 500 hours, then resized it to a $40/month plan ($0.0595/hour) and used it for 200 hours. In that case, the instance will be billed $3.7 for 500 hours and $11.9 for the next 200 hours.
How do I rescue and unrescue an instance?
To rescue an instance,
- Sign in in to your IDrive® Compute account.
- Click the instance you want to rescue.
- Select Rescue from the LHS menu.
- Choose a standard distribution or select a custom image or application stack image from the Images tab.
- Click Rescue.
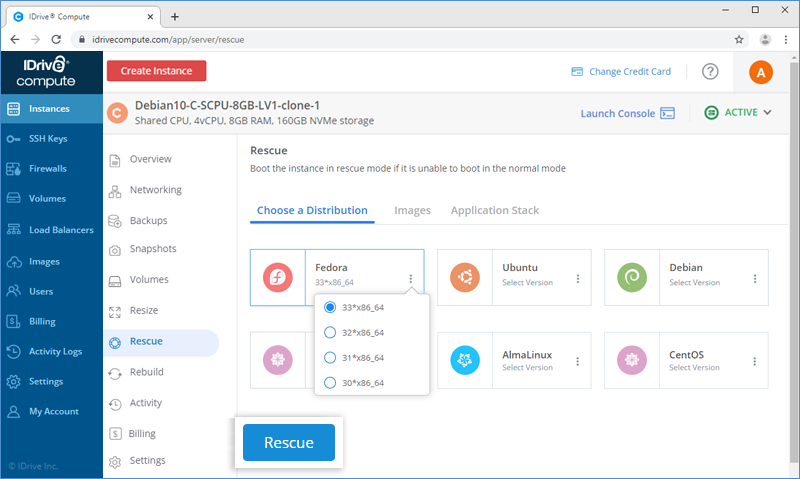
- Click Rescue in the popup.
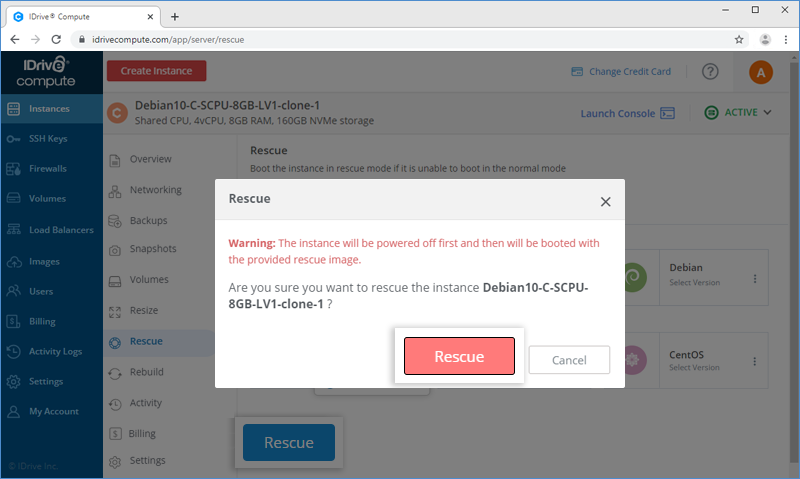
- Login to the rescuing OS and rescued instance disk should be available as an attachment, which can be mounted to perform the rescue operation.
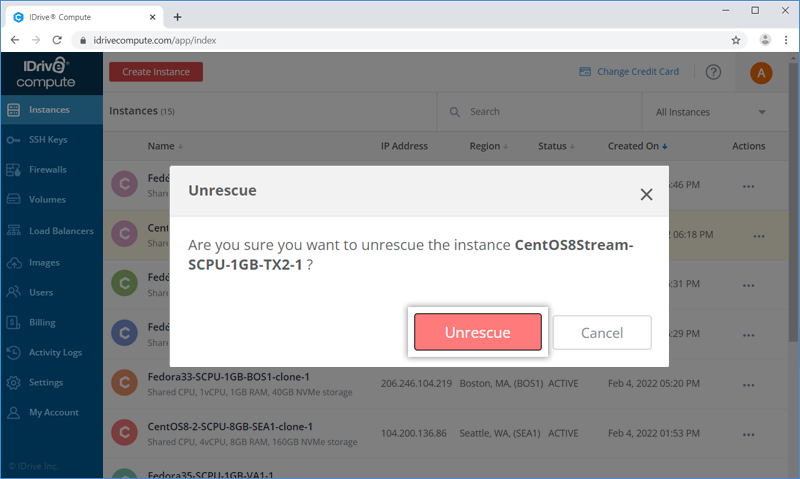
To unrescue an instance,
- Sign in in to your IDrive® Compute account.
- Click Actions against the instance, select Unrescue.
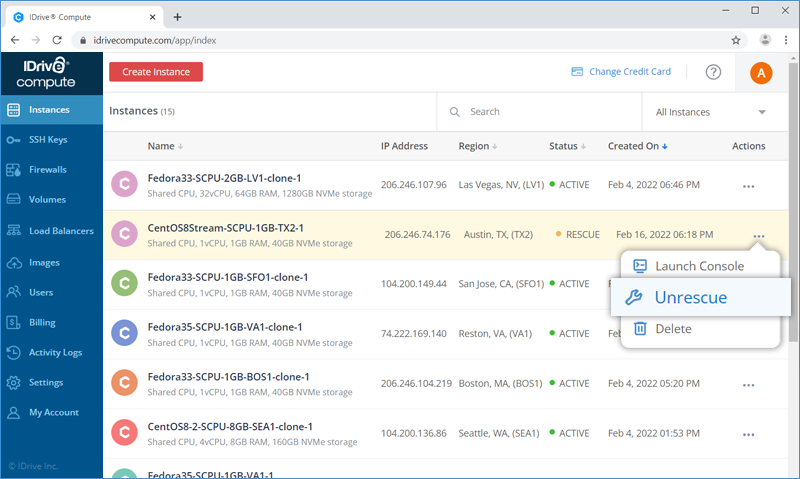
- Click Unrescue in the popup.
How do I mount the rescued instance disk on the rescuing OS?
To mount a rescued instance disk,
- Login (SSH) to the rescuing instance.
- List down the disks attached to the rescuing instance, using lsblk command.
			# lsblk

			NAME  MAJ:MIN RM  SIZE RO TYPE MOUNTPOINT

			vda  252:0  0  2.2G 0 disk

			├─vda1 252:1  0  2.1G 0 part /

			├─vda14 252:14  0  4M 0 part

			└─vda15 252:15  0  106M 0 part /boot/efi

			vdb  252:16  0  160G 0 disk

			├─vdb1  252:17  0 159.9G  0 part

			├─vdb14 252:30  0  4M  0 part

			└─vdb15 252:31  0  106M  0 part
- Mount the rescued instance disk. In the example above it is "vdb1".
# mount /dev/vdb1 /mnt
- In case of any issue during the mount operation, use the parameters "-r", "-o nouuid".
For example: "mount -r -o nouuid /dev/vdb1 /mnt"
I am not able to login with the root password after rescuing my instance. Why?
During a rescue operation, the rescuing OS gets the settings of the rescued instance which were configured at the time of instance creation. Therefore, you will have to use the root password of the rescued instance set during its creation to login.
However, the root password can be changed by accessing the instance via SSH Key.
To rebuild an Instance,
- Sign in to your IDrive® Compute account
- Click Actions against the instance which you want to rebuild, select Rebuild.
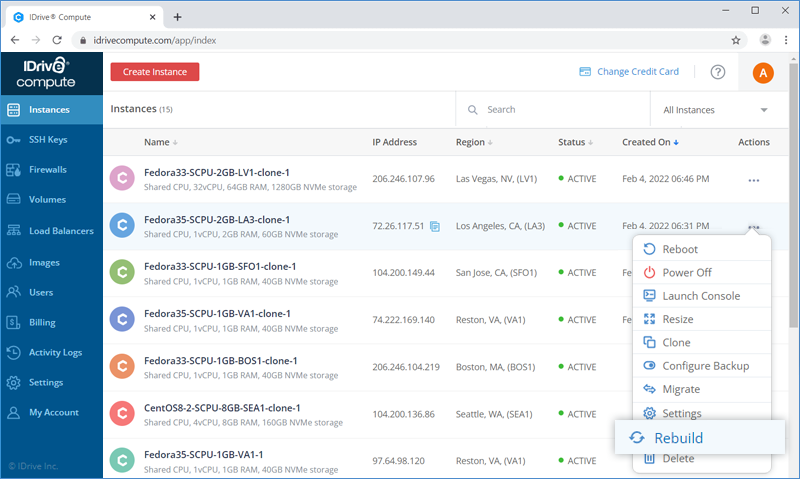
- Choose a standard distribution or select a custom image or application stack image from the Images tab in the Rebuild page.
- Select an authentication method for the instance. You can either set an SSH key or a root password for authentication.
- SSH-Keys - Select SSH Keys from the list of pre-added keys. To add a new key, click Add an SSH Key. Enter the key name and your existing SSH Public Key details, click Add Key.
- Password - A root password will be suggested by default. You may use the same password or create a new password.
- Enter User Data in cloud-config format. This is optional.
- Click Rebuild.
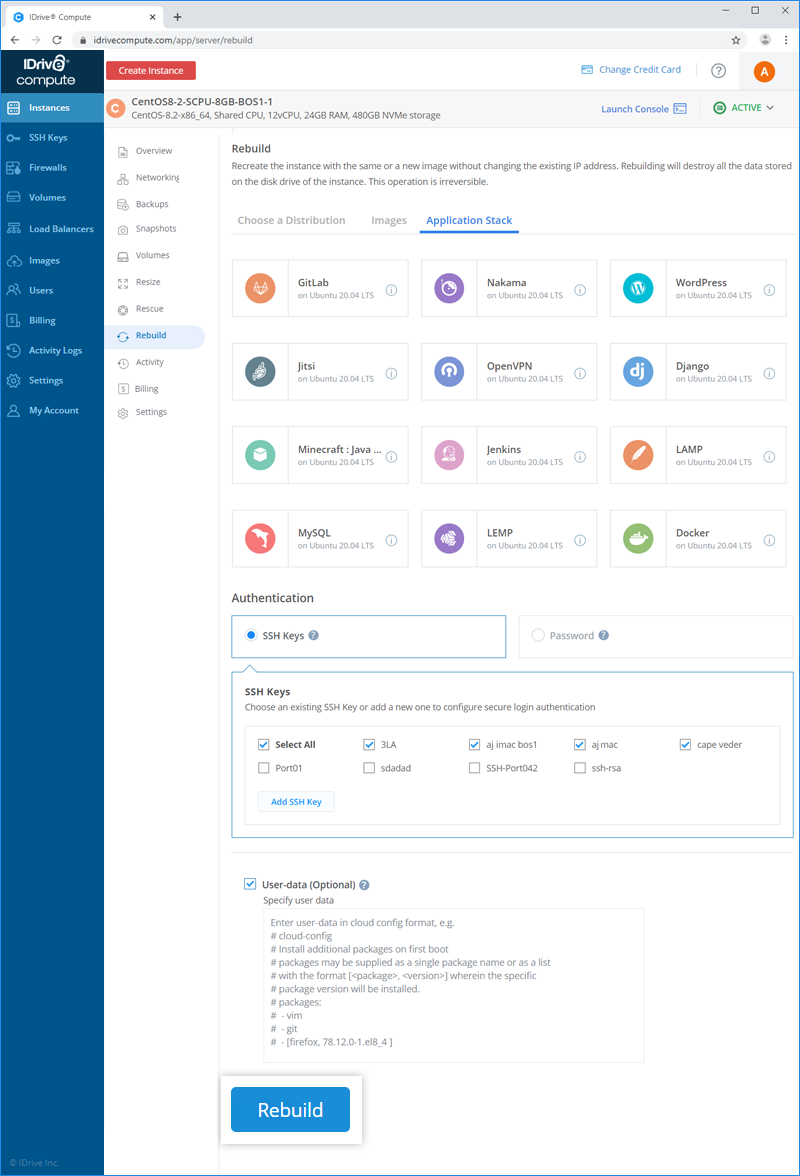
Alternatively, click the instance you want to rebuild and select Rebuild from the LHS menu.
Note: Rebuilding will destroy all the data stored on the disk drive of the instance. The operation is irreversible.
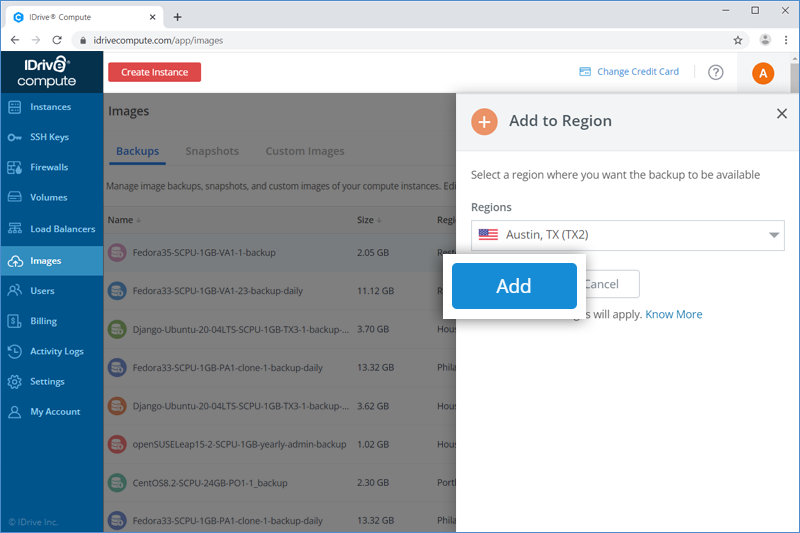
How do I copy a snapshot/backup/ custom image to a specific region?
To add a snapshot/backup/ custom image to a region,
- Sign in to your IDrive® Compute account
- Go to the Images tab and go to the required tab - Snapshot/Backups/ Custom Images.
- Click Actions against the snapshot which you want to use for creating an instance.
- Select Add to Region.

- Select a Region from the drop-down list.
- Click Add.
How do I provide user data to an instance?
User data is arbitrary data that you may provide at the time of creating an instance. The user data will be consumed via Cloud-Init during the first boot of the instance for its configuration. All the Linux distributions supported by IDrive® Compute have Cloud-Init service enabled. However, at present only Cloud-config format is supported.
What is a virtual console and how can it be used?
A virtual console is a user interface that provides VNC support through a web browser. It is used to view the console output of an instance. This allows relaying keyboard and mouse activities to and from an instance.
To use a console,
- Sign in to your IDrive® Compute account.
- Click Actions against the instance for which you want to launch the console.
- Select Launch Console.
This opens a virtual console in a new browser tab.
Can I assign a private IP for my instances?
Yes, you can assign a private IP for your instance during instance creation or choose to assign it anytime later.
To assign a private IPv4 while creating a new instance, select Private IP under Optional Add-ons.
Assigning a private IPv4 address to the instances allows you to enable private communication with other instances (that have private IP) within your account.
Note:- If you assign a private IPv4 address to an instance after creation, the instance will be rebooted to complete the operation.
- In the case of openSUSE instances where a private IPv4 address is assigned after instance creation, users must configure the private network manually.
How do I configure a private IPv4 network for openSUSE instances?
In the case of openSUSE instances where a private IPv4 address is assigned after instance creation, the private network must be configured manually.
Once a private ipv4 address is added, the private network device is eth1 and the public network device is eth0.
To configure a private network on openSUSE instances,
- Find the MAC address of the eth1 adapter.
# ip addr show eth1
- Look for the link/ether value of adapter eth1 , as in the example below
3: eth1: <BROADCAST,MULTICAST> mtu 1500 qdisc noop state DOWN group default qlen 1000

	link/ether 00:00:00:00:00:00 brd ff:ff:ff:ff:ff:ff
The MAC address of eth1 adapter is 00:00:00:00:00:00
- Populate /etc/sysconfig/network/ifcfg-eth1 with the following text. Replace <MAC_ADDRESS> with your actual mac address of eth1 adapter.
		BOOTPROTO=dhcp

		DHCLIENT6_MODE=info

		LLADDR=<MAC_ADDRESS>

		MTU=1450

		STARTMODE=auto
- Bring the network interface up
# ifup eth1
How do I add an SSH Key to my IDrive® Compute account?
To add an SSH key,
- Sign in to your IDrive® Compute account.
- Click the SSH Keys tab.
- Click Add SSH Key. A slider window will open.
- Enter the Key Name.
- Enter your existing SSH Public Key details.
- Click Add Key.
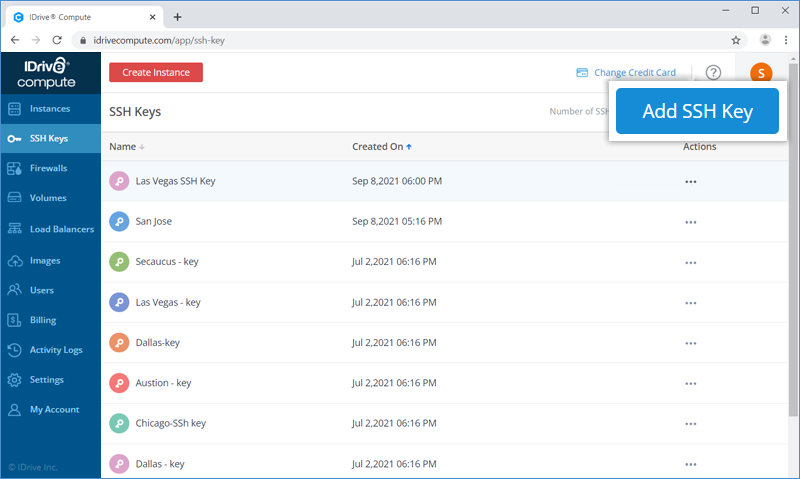
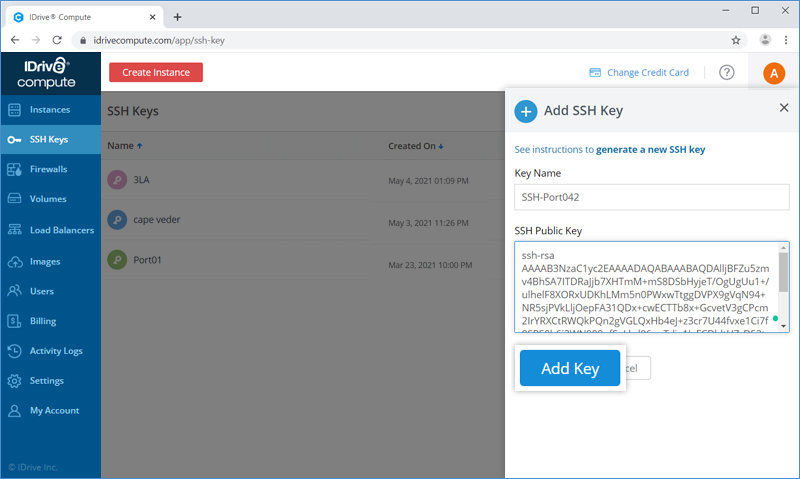
The added SSH key will be displayed in the SSH Keys tab.
How do I generate a new SSH Key?
To generate a new SSH Key on Linux, MacOS, and Windows, follow these instructions:
Note:
- You can create a new key pair, if required.
- Windows users who do not have OpenSSH installed on their computer can install and use PuTTY.
- Open a terminal and run the following commands:
ssh-keygen
- You will be prompted to save and name the key.
a. Generating a public/private rsa key pair


						   Enter the file name in which you want to save the key:

						  (/Users/USER/.ssh/id_rsa)


							b. Next, you will be asked to create and confirm a passphrase for the key. This step is highly recommended.


							Enter passphrase (Keep it empty if you do not want to enter a passphrase):


							Enter same passphrase again:
By default two files will be generated, id_rsa and id_rsa.pub.
- Copy and paste the contents of the .pub file, typically id_rsa.pub, into the SSH Key content field.
cat ~ /.ssh/id_rsa.pubA new SSH Key will be generated. You can add the key to your IDrive® Compute account and use it during new instance creation to log in to the instance securely without requiring a password.
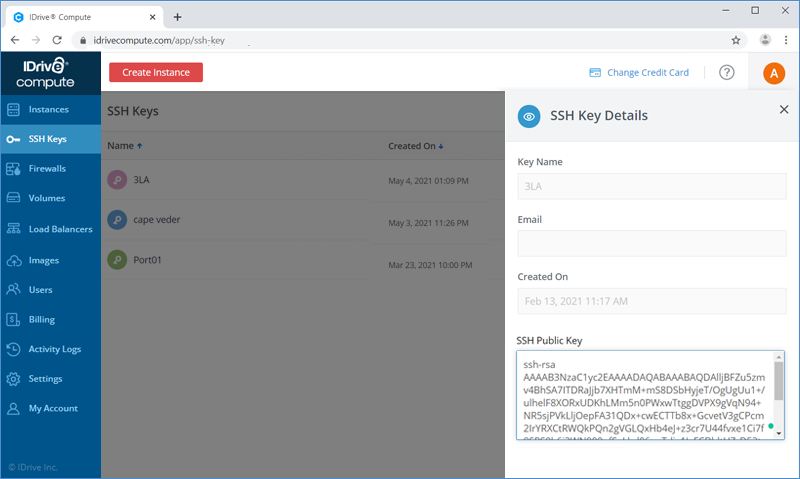
How do I view the details of an SSH Key?
To view the details of an SSH key,
- Sign in to your IDrive® Compute account.
- Go to the SSH Key tab, select the SSH Key whose details you want to see.
- Click Actions and select View Details.
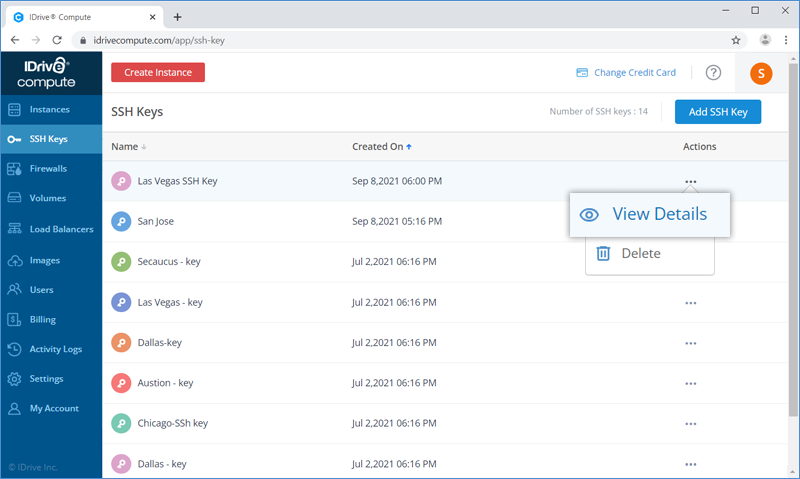
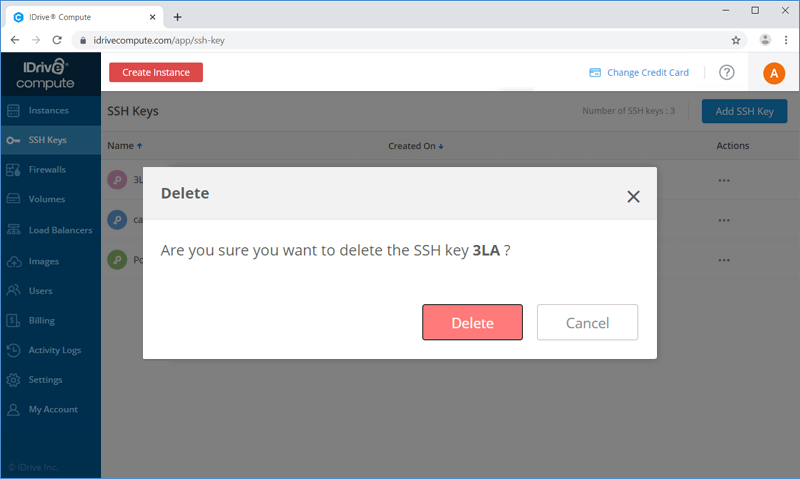
To delete an SSH Key,
- Sign in to your IDrive® Compute account.
- Go to the SSH Keys tab, select the SSH Key you want to delete.
- Click Actions and select Delete.
- Click Delete in the popup.
What is an IDrive® Compute snapshot?
With IDrive® Compute's snapshot feature, you can capture a real-time image of an instance with all its contents, save it, and use it to restore the instance to a specific point in time and create a new instance.
You can take a live snapshot of a running instance. When you take a snapshot of a running instance, you can continue working on it while your snapshot is being taken in the background. A snapshot can also be captured when the instance is offline.
Note: Snapshots cannot be captured for bare-metal instances.
How do I create a snapshot of an instance?
To take a snapshot of an instance,
- Sign in to your IDrive® Compute account.
- Click the instance whose snapshot you want to take.
- Click Snapshot from the LHS menu.
- Enter a name for the snapshot.
- Click Take a live snapshot.
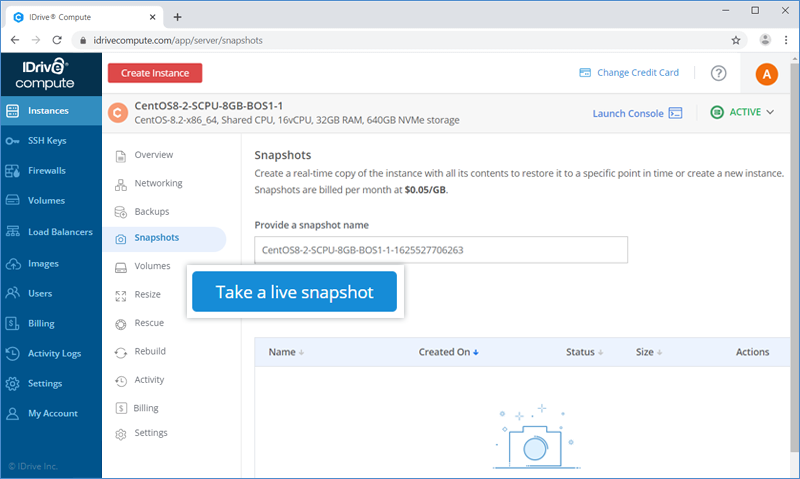
The snapshot will be saved and displayed in the Snapshots page under Images. You can use the snapshot to create an instance. It can also be downloaded on your local computer for future use.
Note: Snapshots will be charged additionally at $0.05/GB/month.
How do I create an instance using a snapshot?
To create an instance using a snapshot,
- Sign in to your IDrive® Compute account.
- Go to the Images tab and click Snapshot.
- Click Actions against the snapshot which you want to use for creating an instance.
- Select Create an instance.
- Select a Region from the drop-down list.
- The snapshot that you are using to create the instance will be selected by default.
- Choose a plan. You can select shared or dedicated CPU and choose yearly or monthly billing.
- Select an authentication method for the instance. You can either set an SSH key or a root password for authentication.
- SSH-Keys - Select SSH Keys from the list of pre-added keys. To add a new key, click Add an SSH Key. Enter the key name and your existing SSH Public Key details, click Add Key.
- Password - A root password will be suggested by default. You may use the same password or create a new password.
- Enter User Data in cloud-config format.
- Add the required number of servers and server name under Finalize and Create.

- Activate the following add-ons as required by clicking the corresponding checkbox:
- Enable Backup - By default, the option to enable daily cloud-based image backup for the instance is selected. Deselect the option if you do not want to enable backup.
- Private IP - Select this option to get a private IP address for your instance.
- Click Create.
On successful creation of a new instance, a message will be displayed and the instance will be listed in the Instances page.
A firewall is a network-based security that helps to manage and define network access to your instances. IDrive® Compute firewalls block unpermitted traffic to your instance based on the defined inbound and outbound rules.
While the outbound rules limit egress traffic to the compute instances, the inbound rules filter the ingress traffic at the network level before it reaches your instances.
How do I create a new firewall in my IDrive® Compute account?
To create a new firewall,
- Sign in to your IDrive® Compute account.
- Click the Firewalls tab.
- Click Create Firewall. A slider window will open.
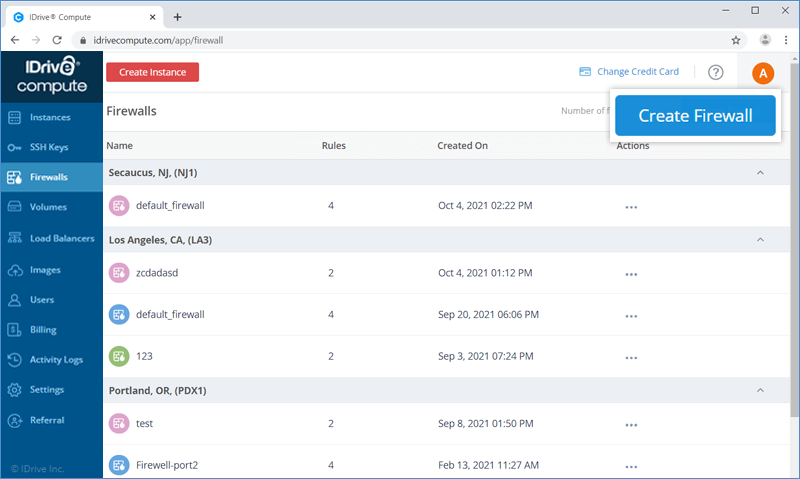
- Select a region from the drop-down menu.
- Enter the Firewall Name.
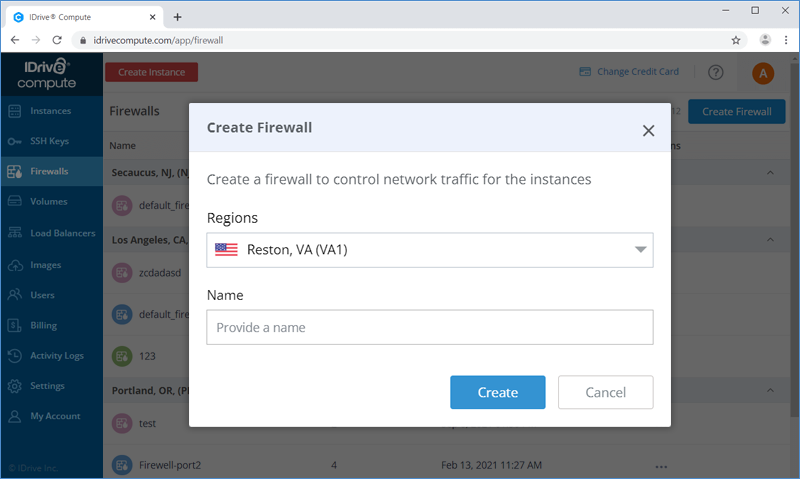
- Click Create.
After successful creation of the firewall you can define the required inbound and outbound rules for it.
What types of firewall rules can I configure in my account?
You can configure inbound and outbound firewall rules in IDrive® Compute. Inbound firewall rules define the traffic flowing inward from the intended ports and servers to your computer. Outbound firewall rules define the traffic flowing outward from your computer to the ports and servers you intend.
To configure inbound rules for a firewall,
- Go to the Firewalls tab.
- Click the required firewall.
- Click New Rule.
- Select a network protocol from the drop-down list.
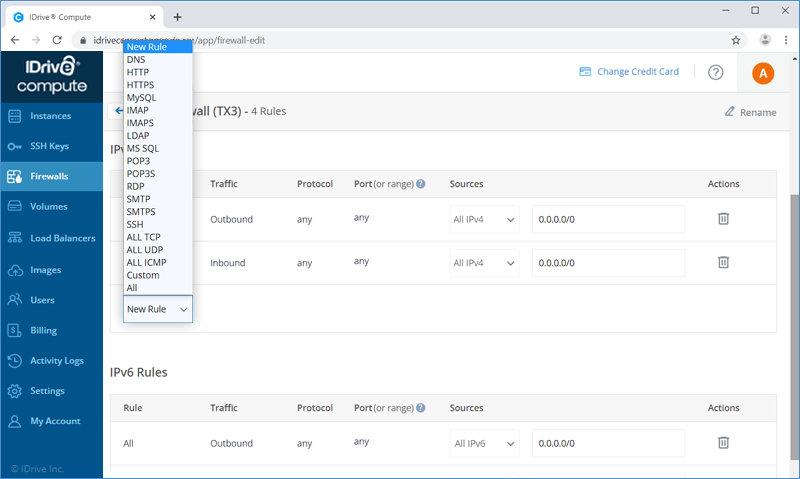
- Click Save.
To configure outbound rules for a firewall,
- Click the required firewall from the Firewalls tab.
- Click New Rule.
- Select a network protocol from the drop-down list.
- Click Save.
Once done, apply the configured firewall rules to the required instances. Enter one or multiple instances in the box as required and click Apply to push the rules to them.
How do I attach a firewall to an instance?
To attach a firewall to an instance,
- Sign in to your IDrive® Compute account.
- Go to the Instances tab.
- Click the instance to which you want to apply a firewall.
Note: Multiple firewalls can be attached to an instance.
- Click Networking from the LHS menu.
- Select the firewalls you want to attach to the instance in the Firewall section.

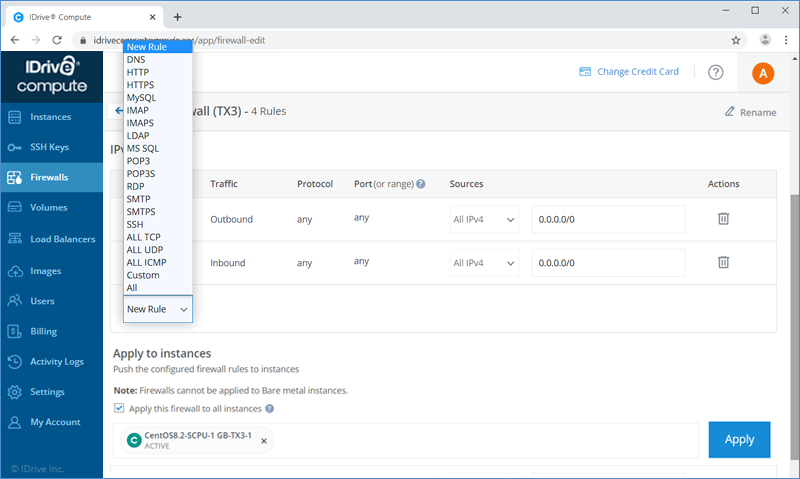
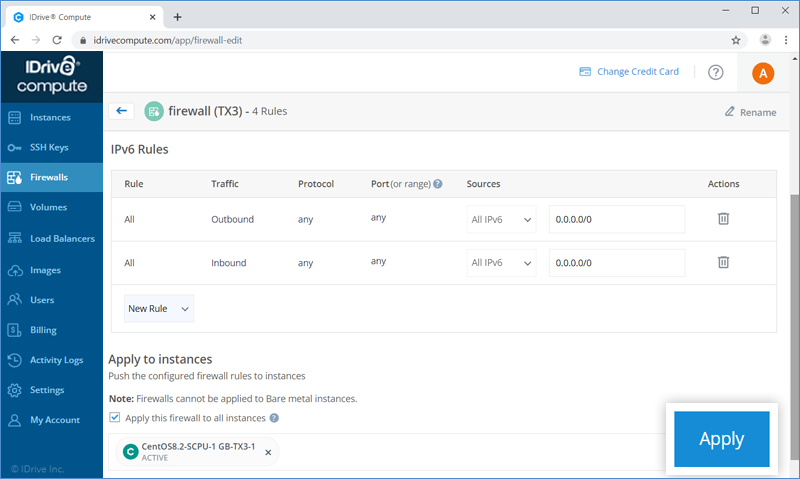
You can also attach a firewall to all the instances in the region in a single click.
To apply a firewall to all instances,
- Sign in to your IDrive® Compute account.
- Go to the Firewalls tab.
- Click Actions against the firewall that you want to attach to an instance and select Edit.
- Select Apply this firewall to all instances checkbox. All the instances present in the region will appear under the Apply to instances section.
- Click Apply.

To manually attach a firewall to multiple instances, select the instances to which you want to attach the firewall and click Apply.
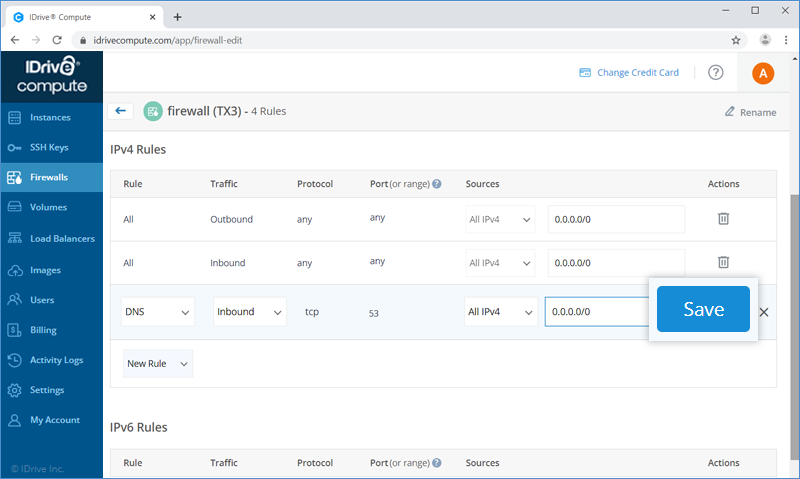
Can I edit the rules configured for a firewall?
Yes, you can modify the configured inbound and outbound firewall rules.
To edit the rules for a firewall,
- Sign in to your IDrive® Compute account.
- Click the Firewalls tab.
- Click Actions against the firewall that you want to attach to an instance and select Edit.
- Edit the type, port range, and sources for your configured inbound and outbound firewall rules as per your preference and click Save.

- Attach or detach the firewall from an instance by entering or removing the instance under the Apply to instances section and click Apply.
Note: All or multiple instances in the region can be attached to a firewall.
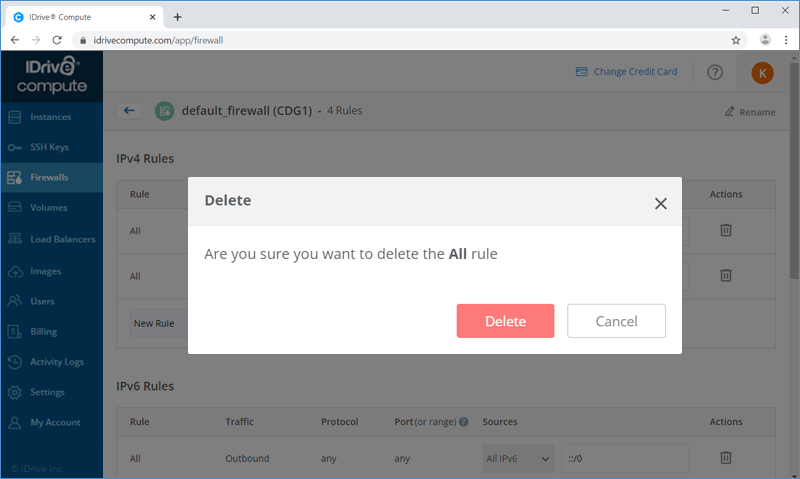
How do I delete a firewall rule?
To delete an inbound or outbound firewall rule,
- Sign in to your IDrive® Compute account.
- Go to the Firewalls tab.
- Click the firewall for which you want to delete a rule.
- Click the
 against the firewall rule that you want to delete.
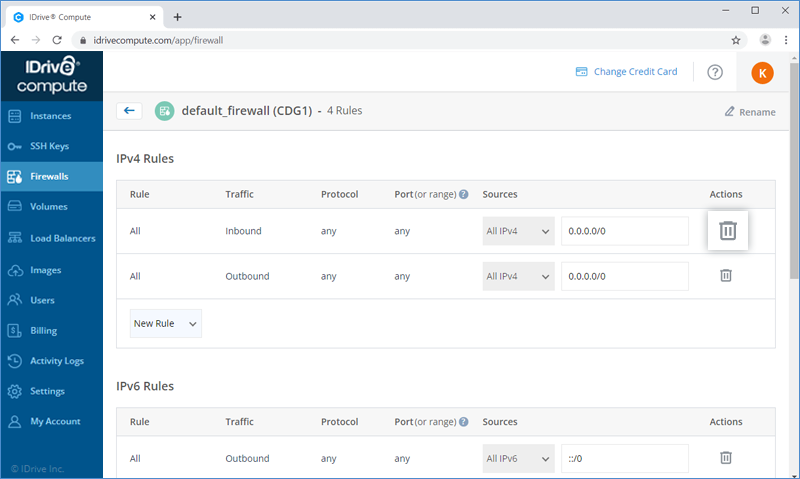
- Click Delete in the popup.
How do I edit a firewall name?
To edit a firewall name,
- Sign in to your IDrive® Compute account.
- Click the Firewalls tab.
- Click Actions against the firewall that you want to attach to an instance and select Edit.
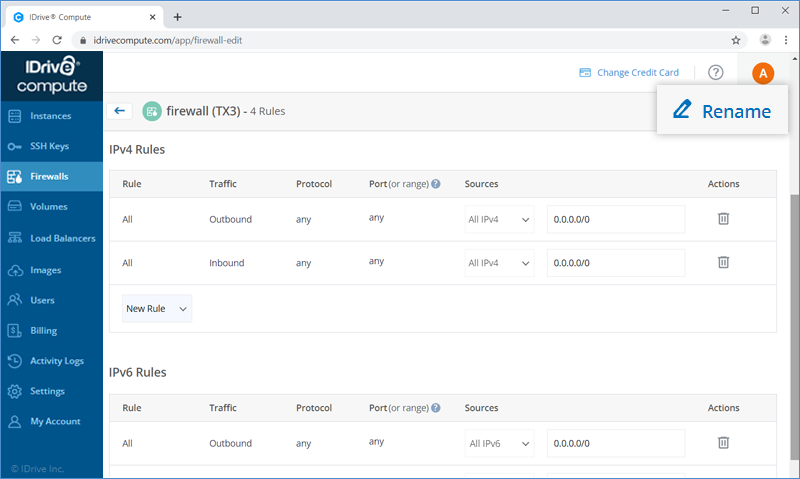
- Click the Edit icon on the top right corner. A slider window will appear.
- Enter a new name for the firewall.
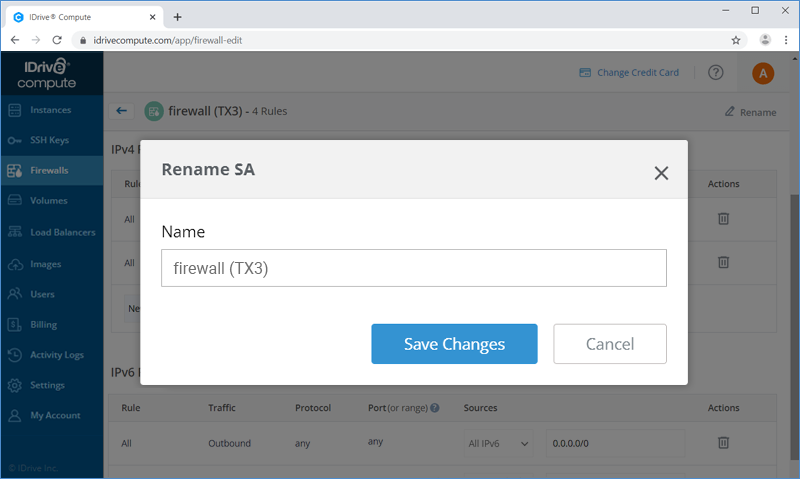
- Click Save.
What sources can I add in my firewall rule?
When a firewall rule is created, by default ALL IPv4 and ALL IPv6 are added in the source to allow everyone to connect to the instance via the protocol mentioned in the rule. However, you can restrict your rule to allow only certain IP ranges by adding a Classless Inter-Domain Routing (CIDR) in the sources.
Why are the outgoing TCP ports blocked? Is it possible to unblock the ports?
Email abuse has evolved as a significant threat in recent times. Spammers are adopting new methods to leverage vulnerabilities and it is becoming increasingly difficult to stop or block email abuse. We are taking all necessary precautions and as an attempt to reduce email abuse from the IDrive® Compute platform, the outgoing TCP ports 25, 465, and 587 are blocked.
The SMTP ports can be opened on-request. Submit a request to our support team stating the reason for opening the port. Our team will verify your request and if they find the reason to be valid, the port will be opened.
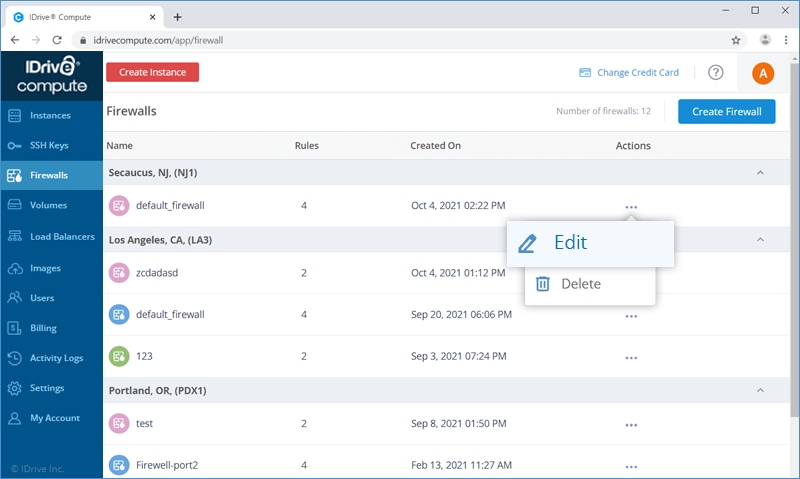
How do I delete a firewall from my account?
To delete a firewall,
- Sign in to your IDrive® Compute account.
- Click the Firewalls tab.
- Click Actions against the firewall that you want to delete from your account and select Delete.
- Click Delete in the popup.
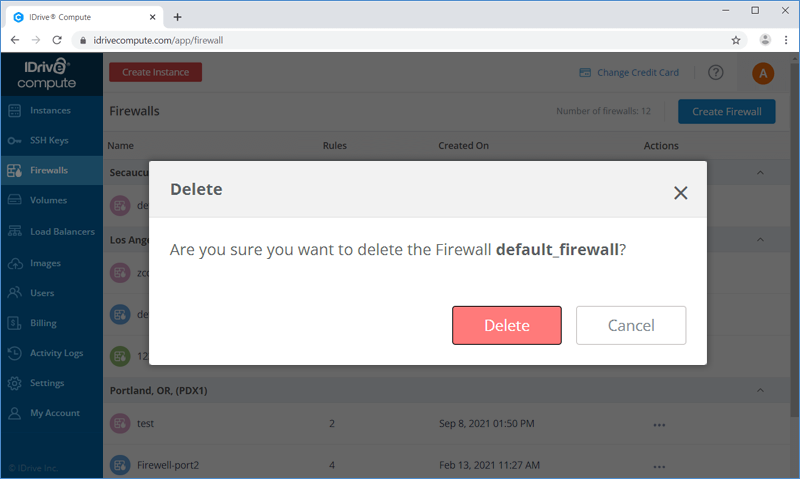
Note: The firewall will be permanently removed from your account.
What is a default firewall and why is it created?
The firewall named 'default_firewall' is a system generated firewall, which gets attached to an instance during its creation. This firewall allows all ingress and egress traffic by default. All operations are allowed on this firewall like any other firewall such as adding and editing rules. However, this firewall cannot be renamed.
If a user deletes this firewall, the system will recreate this firewall whenever a new instance is created in that particular region; otherwise, it gets created during the first instance creation in any particular region.