How to Set Up a Remote Desktop with X2Go on Ubuntu 18.04
User Guides
- Connect to an Instance using SSH Remote Desktop with X2Go
- Encrypted File System on Volumes
X2Go is an open-source remote desktop software for Linux that uses a modified NX 3 protocol. X2Go gives remote access to a Linux system's graphical user interface.
This guide uses X2Go to create an Ubuntu 18.04 XFCE desktop environment that can be easily accessed remotely.
Prerequisites
A running Ubuntu server with 2GB RAM or more is recommended.
User with sudo privileges.
To set up a Remote Desktop using X2Go on Ubuntu 18.04, follow the steps below:
Step 1 - Install the Desktop Environment on your Virtual Machine
The desktop environment is installed on top of the operating system as software that makes the interface more user-friendly. You can choose and install any of the environments such as XFCE, LXDE, MATE Desktop, KDE Plasma Desktop, or more.
XFCE is a lightweight desktop environment, which is recommended for X2Go. It uses fewer resources compared to other environments and provides core functionality seamlessly.
To install the graphical environment for the X2Go server. Use the following commands.
sudo apt-get update
In this guide, we are considering XFCE as the desktop environment. You can install XFCE in two ways; either choose the Minimal Desktop Environment or the Full Desktop Environment for your X2Go server.
To install the Full Desktop Environment, use the below command.
sudo apt-get install xubuntu-desktop
Select lighttdm when prompted to choose a display manager.
To install the Minimal Desktop Environment, use the below command.
sudo apt-get install xubuntu-core
After installing the desktop environment successfully, you need to establish a way to access it remotely.
Step 2 - Install X2Go on your Virtual Machine
X2Go has two components, the X2Go Server – it gets installed on the computer or virtual machine you want to remote control and helps manage the graphical session on the remote machine. The X2Go Client gets installed on the computer or your local machine from which you want to remote control and view the remote application.
To install X2Go server on your virtual machine, use the below command.
sudo apt-get install x2goserver x2goserver-xsession
Step 3 - Install the X2Go Client on your Local Machine
After installing the X2Go server on your virtual machine, you need to install the X2Go client on your local machine. To download the X2Go client, click here
If you are using Debian or Ubuntu, use the below command to install the X2Go client.
sudo apt-get install x2goclient
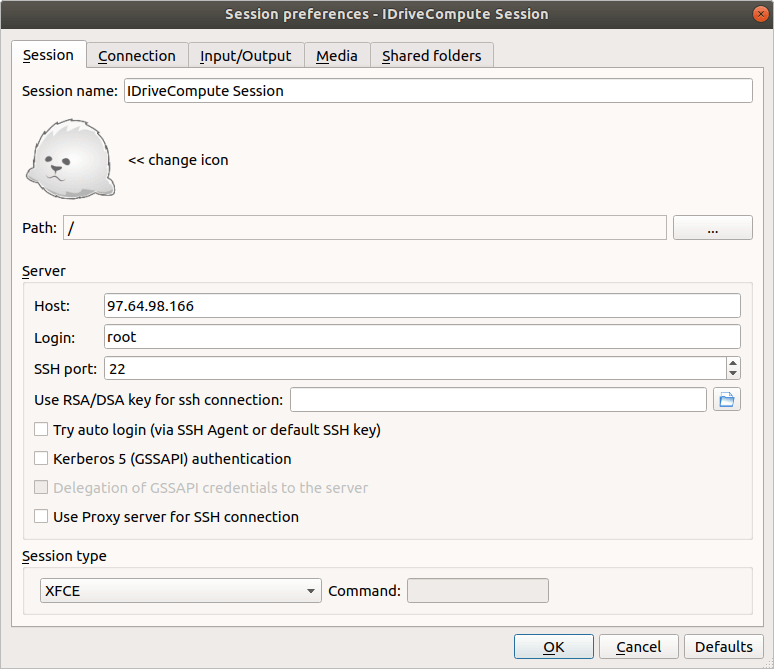
Step 4 — Connect to the Remote Desktop
When you open the X2Go client the first time, you would see the following window. If you don't see it, create a new session by clicking Session and then selecting New Session.
To connect to the Remote Desktop, follow the steps below:
Provide the name in the Session name field.
Enter your virtual machine's IP address or hostname in the Host field.
Enter the username you used for your SSH connection in the Login field.
Since XFCE is installed as the desktop environment, choose XFCE as your Session type.
Enter the SSH port (by default, it is 22).
Click Folder icon next to Use RSA/DSA key for ssh connection and browse your private key.
Click Ok to save the configuration.
Note: If you did not choose to use the SSH keys, you could skip this. However, the X2Go client will always ask for the password every time you log in.
To get started with your graphical session, click the white box and enter your Login and Password.
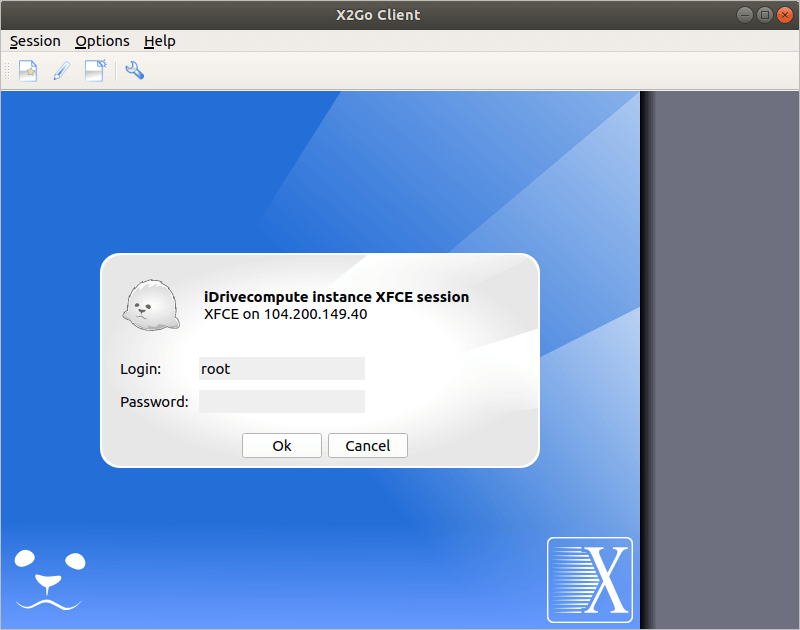
As your remote desktop appears, you can start accessing it and get your work done.
As your remote desktop appears, you can start accessing it and get your work done.
If you encounter the following error message,
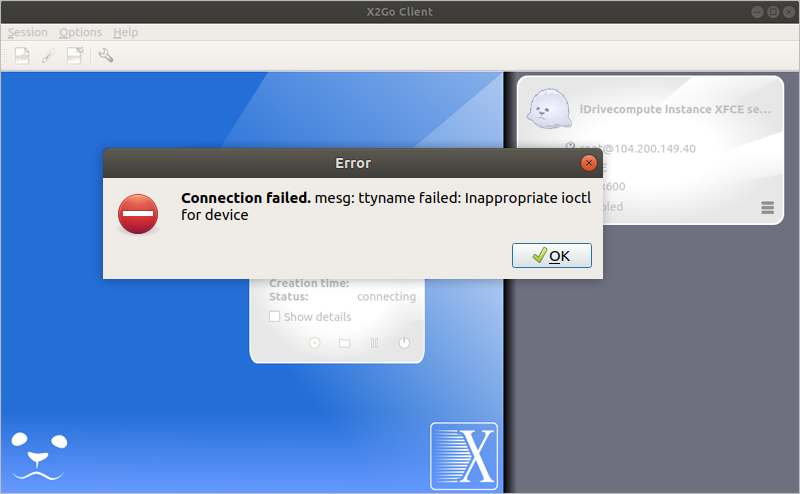
open the /root/.profile file and replace mesg n || true with tty -s && mesg n
This method should work since the mesg -n command is only called if a terminal device is present.